Friday, 18 April 2014

Easter Weekend FREEPOST!


We are happy to announce another of our popular Freepost Weekends running through the Easter Weekend until midnight on Monday 22nd April.

Our offer is for free standard post within the UK. Orders to all other countries will benefit from a £2.50 discount on their postage.

To take advantage of this offer use the code EASTERFREEBIE at checkout.

Please note discounts will not be applied retrospectively.  If you place multiple orders during the weekend, they will be sent in one shipment.

We will be back at work on Tuesday 22nd April and will prepare your orders then - it will be a busy day and we will be sending out orders on a first come first served basis, so if you need your items quickly, make sure you place your order early!  Our shop website is: www.jasminstudiocrafts.com

Happy Easter to all our lovely customers!

Friday, 29 November 2013

Christmas 2013 Order Deadlines & Shop Timetables

Edit 23/12/13:
***

We are now closed for the holidays, but we will be back on 2nd January to prepare all your orders and reply to emails.  We thank you very much for your custom and support this past year, and we look forward to being able to supply you with lots more fab new products next year.  

With love and peace from all of us at Jasmin Studio Crafts,

Jasmin, Alodie, Michelle & Donna xx

***

In order to allow us to get your festive purchases to you in good time, we would ask that you kindly note our last order dates to allow us to get your items to you in time.  The dates below are for parcels sent by Royal Mail’s standard services:

UK:  Thursday 19 December 
UK with Faster Post upgrade: Friday 20 December
Western Europe:  Monday  9 December
Eastern Europe:  Friday 6 December
USA & Canada:  Monday 9 December
Everywhere else:  Tuesday 3 December

International courier deliveries will vary, please ask for details.

We will be closed for Christmas from 24 December, but we’ll be back on 2 January ready for a brand new year full of brand new jewellery!


Friday, 18 October 2013

The Glaze is Back!

We are excited to tell you that we have received a delivery of large bottles of Diamond Glaze, and the standard 60ml bottles should be in the shop early next week are in stock NOW!  This must have been the most long awaited product to return to our shelves!

In other news, we have lots of exciting new items in the shop - have you seen our fabulous new cufflinks?


They take a 14mm glass cab or sticker, and we are quite sure you will not find a better quality cufflink.

Did you see our new resin birdies?


And hooray, at long last - our very own resin!!


Roll on Christmas - we are ready for you! 


Wednesday, 18 September 2013

Planning ahead, wholesale orders & lovely discounts!

Somewhat alarming considering the sunny last post, but our heating is on and in just a little while we will all be starting to get ready for Christmas.  Goodness, here we are - again!

The preparations start early for makers and sellers, and once again we anticipate a busy period.  To help you plan ahead and ensure you can obtain your materials in good time, we taking wholesale orders now.

Wholesale orders have a minimum order quantity of 100 pieces per item.  For those items where we have the 100-packs in stock already, they will be showing through the website, however where they don't appear on the website, please get in touch and we should be able to get them in for you.

To place a wholesale order we request a 50% deposit payable at the time of placing the order, and the remainder when the order is ready to be shipped.  This includes a non-refundable 12.5% fee to cover our costs in the event of a customer cancelling or changing the order (the fee will not be charged if the order is completed as agreed).

Some special order items can take as much as 12 weeks to restock so please bear this in mind when placing your order.

This year we have had supply problems with Diamond Glaze - we apologise for this, we have tried hard for very many months to get hold of some but the distributor has been unable to supply it.  Did you know however that Glossy Accents works just as well as Diamond Glaze?  Give it a try, we are sure you will love it!


Remember also that we have discounts available for other large orders.  For all orders over £100 (before P&P) you can use the code TENPERCENT at checkout and obtain a 10% discount on your order.  We also offer reduced rates for large orders of the same item (100pcs and up) - where these are not offered as 100-packs on the website, please do ask.  If we have them available we will be able to offer the discounted rate (usually 20%). Please note only one of the two discounts will be applicable to any order, not both.

Our flat rate domestic postage rate will not apply to wholesale and special orders; carriage will be charged at cost.

Happy planning!

Monday, 22 July 2013

Feeling hot?

What a scorcher of a summer, and who worried that we wouldn't get one at all?  We know we did!  For those of us who can't resist a bit of crafting outdoors, some seaside stacking rings - made with our glass cabs with some easy Sharpie drawings in lively colours, and glued onto a set of pad rings.


Can you feel the sunshine?

Monday, 15 July 2013

Playing with Words

This week we have discovered a new toy - a website really, tagxedo.com that lets you create some funky designs using your own words, favourite passages from books you love, websites, or any text...

This was what it gave us when we entered our blog address:


We can see this being a lot of fun.  With the right words, it would make some excellent backgrounds for jewellery.  And you can give form to your words...


Tagxedo works along similar lines to Wordle, which allows you to create word clouds.  Here's a link to a Wordle cloud we made earlier.  We find Wordle clouds a bit tricky to save as an image and print for the purposes of making something with them, but it is brilliant if you fancy livening up a wall with a cool new print.

We rate both apps as fab. :)


Wednesday, 5 June 2013

Sweetly Scrapped

Today we'd like to introduce you to a lovely shop we found on our web travels - Sweetly Scrapped.


Run by Emily from across the pond in the US, it offers a fabulous selection of scrapbooking goodies as well as a freebie section of images for download which are free for personal use.  We love the tags which we will definitely be using together with our handmade gifts for upcoming birthdays:


Cuuute!

Wednesday, 29 May 2013

Kids' Party Ideas

My seven year old daughter had some friends over last weekend and they soon found a stash of trays and epoxy stickers that I had hoped would have been a well-orchestrated surprise at the next birthday party.  They are all crazy about My Little Pony and Hello Kitty and I had some images that I knew would be great for making pendants and then taking home as part of the party bag.  

So whilst the cat was out of the party bag, making these necklaces kept them quiet, focussed and entertained for a good long while:  


(Incidentally, images of these and other popular characters are all copyrighted and as such you really should not make them up for sale, though I suspect a small bit of making for personal use may be allowed?)  

Next time I won't wait for a birthday - they are all asking to do it again!  But it would be a great crafty activity for a birthday party.   We have plenty of slight seconds that are cheap as chips and perfect for letting the kids loose on their creative adventures.  Get some magnets in also and some superhero images for the boys - they will all enjoy it!  

I mean really, who cares about cutting a perfect circle when the lovely Rainbow Dash is smiling at you?


Monday, 27 May 2013

What Would You Put in Yours?

As you will have realised, we love jewellery that displays little worlds and tiny treasures.  We have been playing with a few ideas for our fabulous glass vials - but we wondered, what would you put in yours?  Answers on a postcard, or leave a comment below, far easier.  The best idea will win a set of one of each of our glass vials (that is one sphere, one tube and a glass heart).

Here are some of our suggestions:


Not sure if you can see it very clearly, but there is one single dandelion clock in that tiny tube!


Teeny no-hole beads in pinks and reds


A little lock of hair - this my daughter's!


It doesn't look particularly appealing and perhaps I should have let it dry thoroughly before popping the lid on - a bit of earth from a place that I love.

What are your ideas?   Closing date for suggestions: Sunday 2nd June.


Saturday, 25 May 2013

How to Make a Glass Tile Pendant with a Bail

We realised recently that in all the blog posts we have written, there wasn't one on how to make a glass pendant using a bail instead of a tray.  This can be tricky sometimes as the back of the glass isn't always very attractive after you have glued on your image.

The simplest way by far is to cover it with something more attractive.

Here I will show you how I do it.

I had a beautiful little bird image that I glued onto a cabochon and let dry for, oh, about a year... not intentionally, I just had lots of these from a previous project!


I got some Glossy Accents, E6000 glue, some glitter and a bail.


The birdie cabochon was nice but a bit rought around the edges, and the paper was obviously too big for the cab, so a bit of cutting and tidying was in order.  The dried glaze that had oozed out of the glass cracked as I cut it but as it would be covered again with more glaze, this did not bother me.  You can find it easier to use a nail file to tidy up the edges.


It bothered me more that the edge of the paper was so bright white, so I painted it with a purple pen to match the glitter I had.


So far so tidy.  No sharp edges, no visible paper, no ink onto the image.  All good!


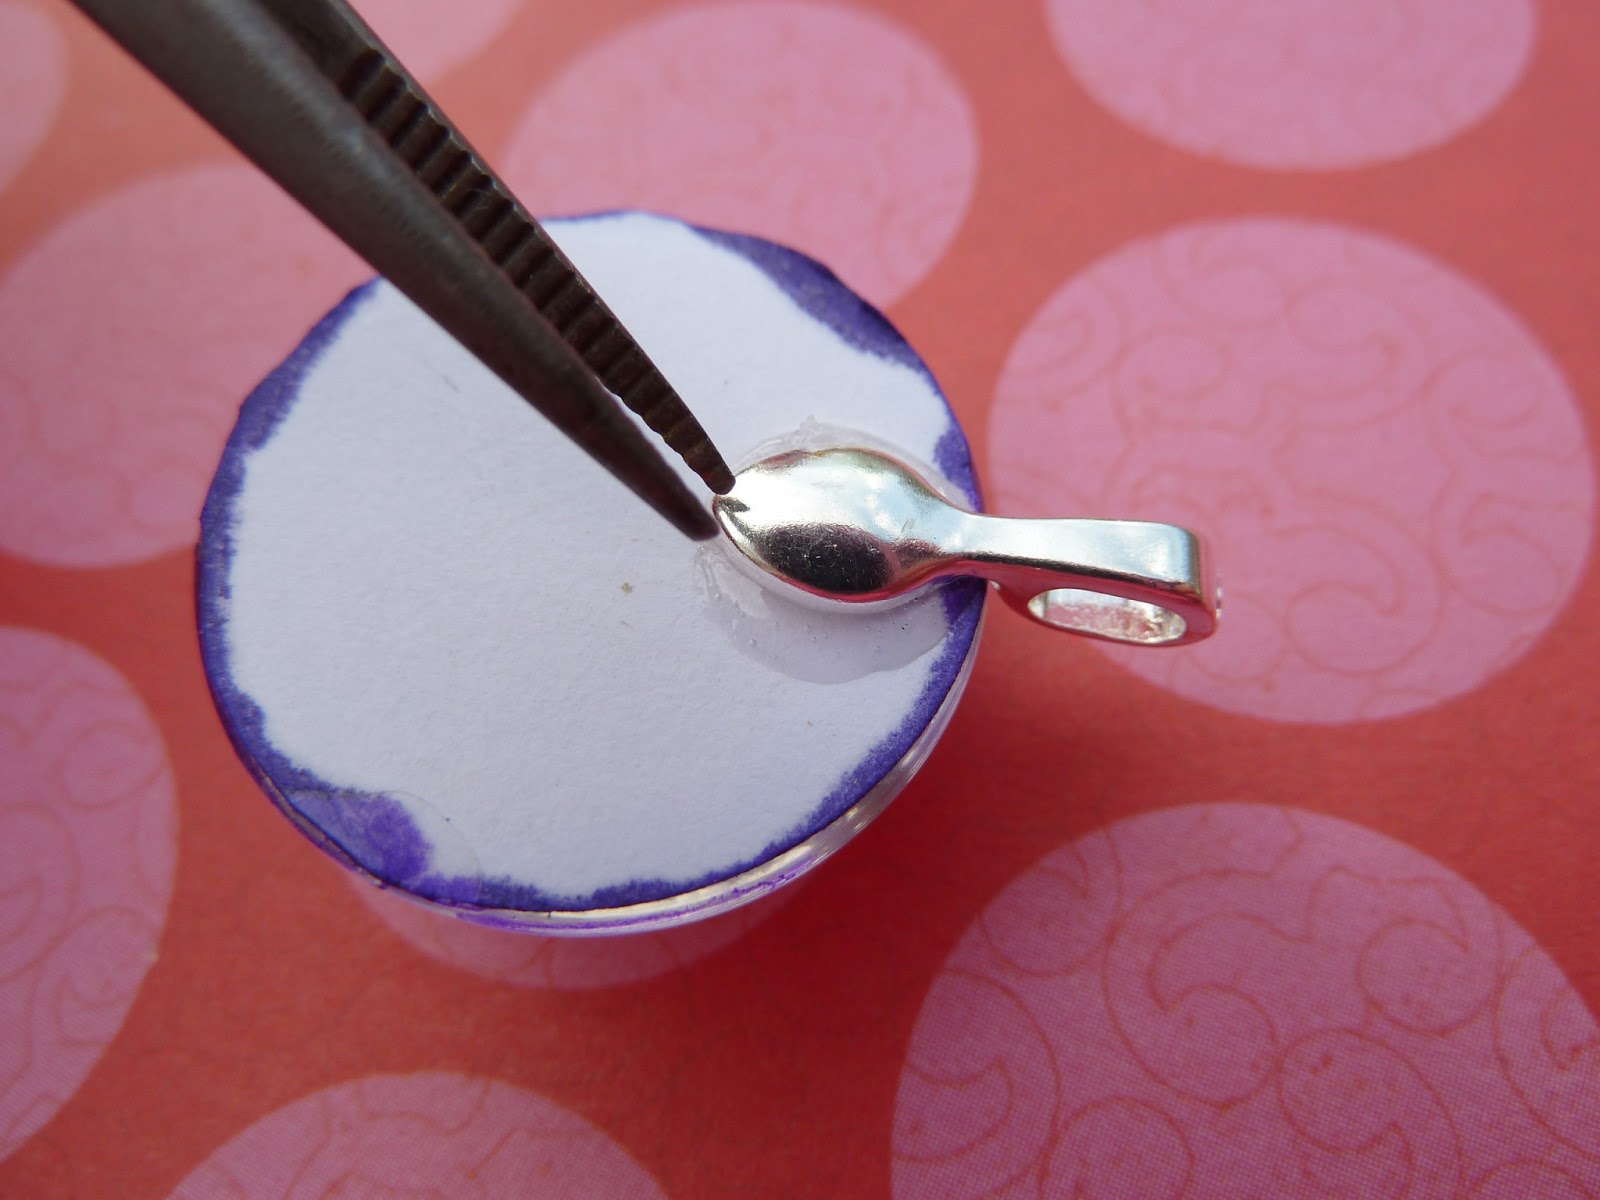
Next, I glued the bail onto the back using a smidgen of E6000 and ensuring it is nice and straight.


E6000 will leave 'hairs' so I used tweezers to remove these.  You will see in the picture below a good blob of E6000 that doesn't look so good if left uncovered.  If that is your intention, then you can always apply the E6000 with a tootpick onto the bail - just a small amount and none will seep out.  Of course I didn't do it so elegantly here, but it doesn't matter as it will get covered up.


Once the E6000 was dry, I applied a layer of Glossy Accents....


And immediately sprinkled it with glitter so the entire glue surface was covered. Blow gently onto the piece so the excess glitter cleans off.  The bail looks covered in this picture but it cleans up nicely when dry.  You don't want to handle it too much at this stage as it will be very wet. I let this dry straight (aided by the tweezers!) for a good long while.  A day or two is good.


When completely dry, apply another coat of Glossy Accents on the back.  You don't really want to have bare glitter next to your skin or clothes.  Again leave to dry.  As this will be your top coat, look out for bubbles - keep a watch as they may not appear initally.


And there you go - a beautiful pendant, with a smooth glossy and professional looking back!  The coat of glaze over the top (we used Glossy Accents again here) makes the glitter become more of a shimmer, a little more subdued. We like this effect a lot!


Other methods you can try for finishing the back:
- using ModPodge, cover with a decorative paper, and when dry, file the edges and apply a layer of glaze
- paint it
- try using a fabric covering instead of paper
- coat the back with a funky nail varnish
- decoupage the back with pieces of paper and ModPodge
- instead of glitter, try flocking material
- use a stamp and embossing powder
- if you sell these pieces, it's a good place to add your own signature, your logo or your website details

Show us how you make yours on our Facebook page @ jasminstudiocrafts.com!