Gorgeous!
Showing posts with label New Items. Show all posts
Friday, 14 October 2016
Friday, 9 September 2016
Free Resin Offer!
Resin is back and we are celebrating by offering a free 75g set of ECO resin with any purchase of standard or low viscosity resin! You can find both options here, in two different sizes: 75g and a large 375g set. So if you purchase one set of resin (either type, either size) and we will throw in one free set of ECO Resin! This is not just another free sample offer, this is a full size 75g set free with any purchase of resin! This offer is open until Sunday 18th September.
ECO Resin is a new range of resins that we will be offering that are solvent-free, non-toxic and easy to use for top quality domed and cold-enamelled items.
We also sell colourants for these resins and lots of accessories for all your resin makes (do also look at our bezels which are perfect for filling!). Please note it is only the full 2-part resin sets that attract this offer, and not any colours or accessories.
We are unable to send resin overseas at this stage, so regrettably this offer is open only to UK customers.
Our resin is manufactured in the UK by RF Bright, a family owned business from Kent that specialises in resins for industry and jewellery making. The resins are lovely to use, they mix easily and take colour and inclusions well, don't produce noxious fumes and the end result comes up clear and glossy. We love these resins and are planning lots of projects using them - keep an eye out on our tutorials page!
Thursday, 23 June 2016
New Website Offer

We have been aware for a long time that our old website just wasn't up to the job, so we hope you will like the new site. Some improvements:
- Your basket will now save for a few days, so do go ahead and make that cup of tea, your basket will still be there when you come back.
- You can now buy a larger number of items individually if you really only want to try out a new piece,
- but if you want to buy 10, as before, it will still be the same price as on the old website.
- If you prefer to buy in larger quantities, the website will now work out a wholesale discount automatically. Our wholesale prices are available to all, and you can check them out within each item's page.
- Stuck for gift ideas for a crafty person? consider a gift certificate!
So we would like to thank you for your patience and continued custom by offering a huge 20% off EVERY ITEM in the store - simply add code CELEBRATE at checkout. This code is valid until Sunday 26th June and can be used multiple times.
Friday, 18 October 2013
The Glaze is Back!
We are excited to tell you that we have received a delivery of large bottles of Diamond Glaze, and the standard 60ml bottles should be in the shop early next week are in stock NOW! This must have been the most long awaited product to return to our shelves!
In other news, we have lots of exciting new items in the shop - have you seen our fabulous new cufflinks?
They take a 14mm glass cab or sticker, and we are quite sure you will not find a better quality cufflink.
Did you see our new resin birdies?
In other news, we have lots of exciting new items in the shop - have you seen our fabulous new cufflinks?
They take a 14mm glass cab or sticker, and we are quite sure you will not find a better quality cufflink.
Did you see our new resin birdies?
And hooray, at long last - our very own resin!!
Roll on Christmas - we are ready for you!
Wednesday, 22 May 2013
Glasses Chain
If you are anything like me - myopic and astigmatic to a T - you probably won't have a need for these. I never can take my glasses off, all hell would quite possibly break loose if I did. But if you are an occasional glasses wearer, say for reading, you will understand the value of a chain for your glasses, that you can hang around your neck, always keeping your specs at hand ready to be put on at a moment's notice.
We now stock the handy little rubber bits that connect the chain to the glasses, so we thought a trial was in order. We got together some chain, jump rings (not shown), some fancy bow connectors that have just arrived in the shop, two 10mm connector blanks and a set of epoxy stickers to fit - as the connector blanks are double sided we used four stickers. We picked a piece of scrapbooking paper with a sweet little rose pattern for our inserts. All the metal pieces are vintage copper finish.
We started by making the little connector blanks, first stick the epoxy domes onto your patterned paper and cut around this, then ModPodge the little pieces onto your connector blanks, allowing them a bit of time to dry. If the glue is too much and overspills (like it did here!), it's not a big problem as it cleans up nicely when dry.
Then lay out all your pieces so that all your bows and your flower images are facing the right way up.
Attach to your chain, pop your rubber connectors on with a jump ring and model on your glasses. Result!
We now stock the handy little rubber bits that connect the chain to the glasses, so we thought a trial was in order. We got together some chain, jump rings (not shown), some fancy bow connectors that have just arrived in the shop, two 10mm connector blanks and a set of epoxy stickers to fit - as the connector blanks are double sided we used four stickers. We picked a piece of scrapbooking paper with a sweet little rose pattern for our inserts. All the metal pieces are vintage copper finish.
We started by making the little connector blanks, first stick the epoxy domes onto your patterned paper and cut around this, then ModPodge the little pieces onto your connector blanks, allowing them a bit of time to dry. If the glue is too much and overspills (like it did here!), it's not a big problem as it cleans up nicely when dry.
Then lay out all your pieces so that all your bows and your flower images are facing the right way up.
Attach to your chain, pop your rubber connectors on with a jump ring and model on your glasses. Result!
Labels:
Epoxy Stickers,
Ideas,
New Items,
Tutorial
Monday, 20 May 2013
Shrink Plastic Jewellery
We have now started selling amazing shrink plastic.
Here are some quick instructions on what we do:
- choose the right product for your purposes: Shrinkles Shrink Art will be good for stamping and drawing; Shrinkjet for printing from an inkjet printer
- use permanent inks (thin lines work best) or coloured pencils (not soft or waxy). For the black shrink plastic, metallic pens work well
- cut your artwork around the shape of the design. The plastic may not shrink evenly so you may not get a perfect circle or square, even if you use a craft punch, but free flow shapes will be great
- make any holes you may need for jump rings at this stage (a standard hole punch 7mm away from the edge is good for this)
- preheat your oven to 175oC, 350oF, Gas Mark 3
- prepare a flat and smooth baking tray by lining it with foil and a layer of baking parchment. High walled baking trays will not work well here.
- the makers recommend a book but we like to warm up a pan a little bit and have another piece of baking parchment nearby.
- pop your piece onto the cool baking tray and in the oven. You will see it curl up and then flatten.
- once flat again remove the baking tray from the oven, immediately cover your piece with parchment paper and press the warmed pan over it. If the pan is hot it could burn your piece - keep it warm only - the idea is that your piece will be kept warm enough by the pan to flatten completely.
- carefully remove the piece and leave to cool
- at this point you can tidy up any sharp edges or uneven shape with a file
- use a couple of coats of ModPodge to seal the image
- we also like to apply a top layer of glossy accents onto the image for a glossy, resin-y look
- glue/thread onto the jewellery of your choice
We will add some photos of the process soon - in the excitement we forgot to take any good ones! Now we have to have another making session all over again. Ah, well. A perk of the job. :)
Sunday, 19 May 2013
New Hollow Bowls
Hello Inspiration! Good to have you back! We know you only went away momentarily as we were fretting and faffing with taxes and pricing and all unexciting things, but then in came these beautiful hollow bowls and there you were! It is good to have you here again!
So you will have already seen these amazaroola new hollow bowls. They are delicate, they are fragile, they have a lovely handmade feel about them. They will serve to encase your precious mementos, your artistic little sculptures and a myriad miniature worlds.
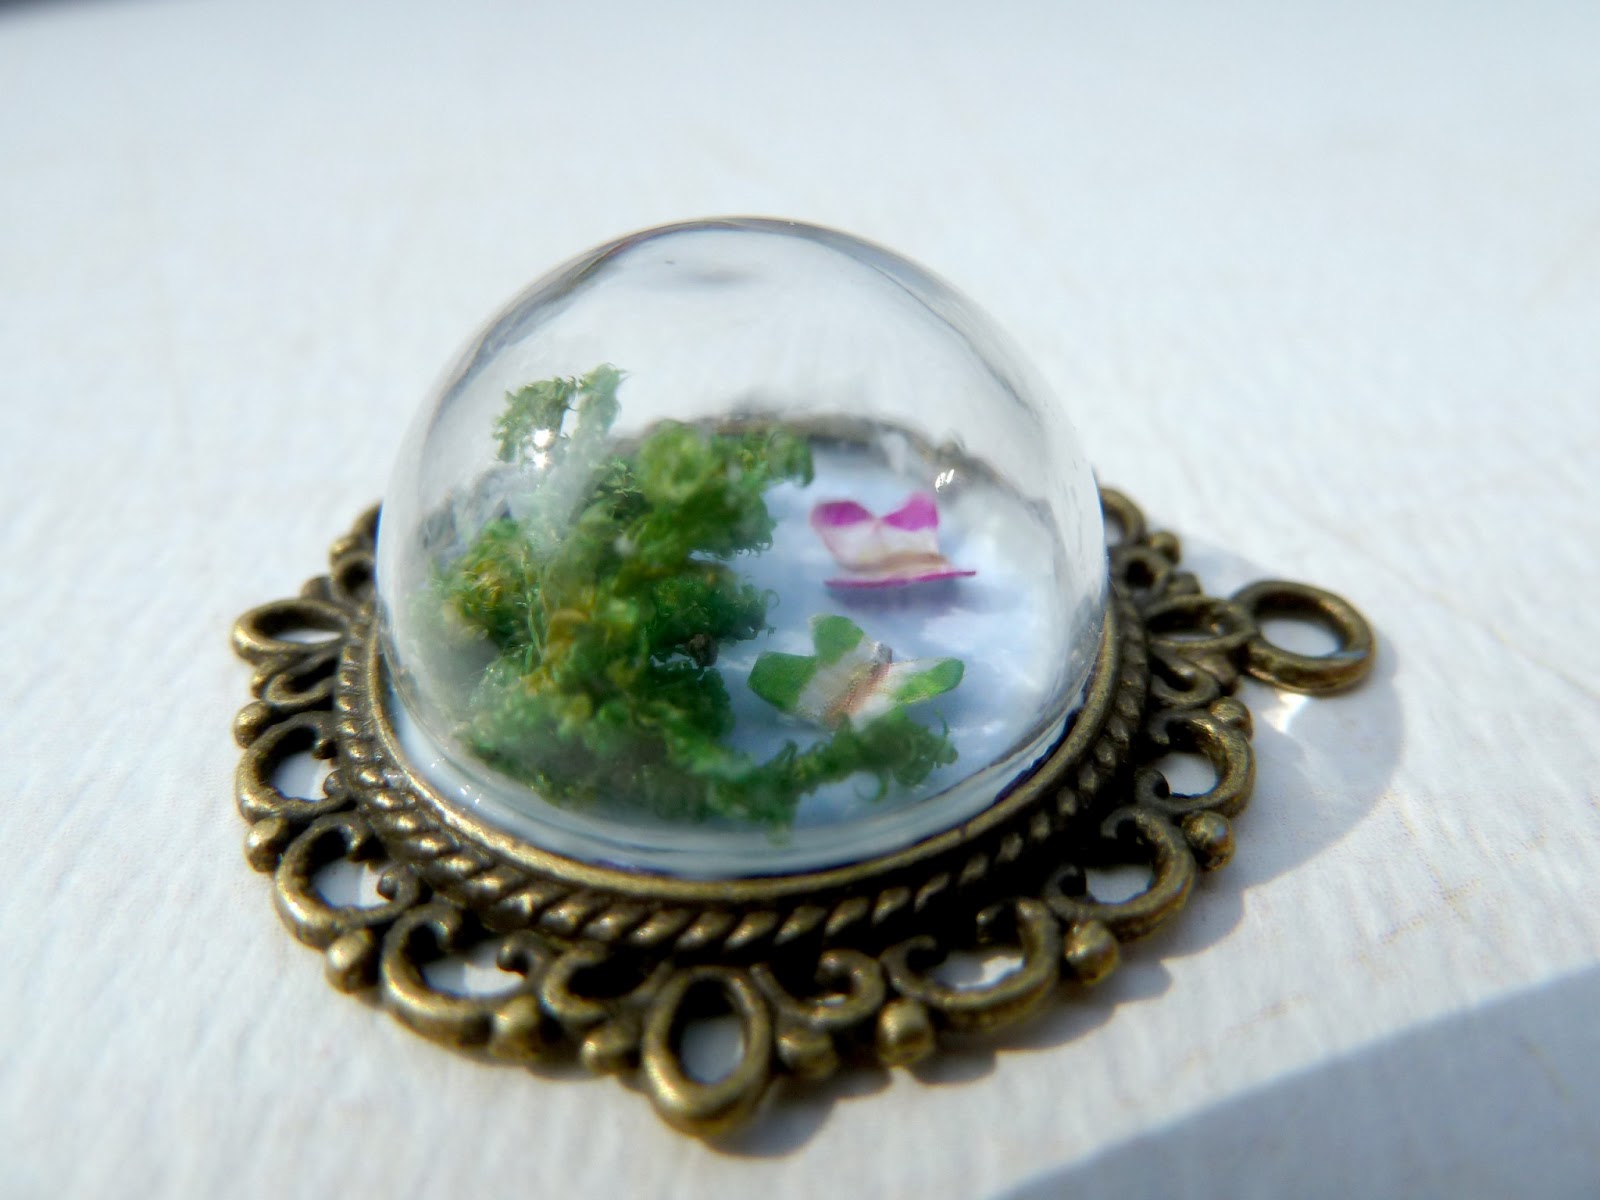
We have come up with several ideas for them already, but we must pace ourselves. So we bring you just one little idea, nothing particularly new about it, it simply revolves around the idea of picking a simple concept and converting it into a small (very small) representation of the life-size one. In this case, I had been sitting in the garden and thought I would try to encapsulate my garden into a pendant tray. Yes I could have taken a photo and set it under a cabochon, but I really wanted a diorama effect. So I gathered my materials:
and went about the making of the piece. I had:
So you will have already seen these amazaroola new hollow bowls. They are delicate, they are fragile, they have a lovely handmade feel about them. They will serve to encase your precious mementos, your artistic little sculptures and a myriad miniature worlds.
We have come up with several ideas for them already, but we must pace ourselves. So we bring you just one little idea, nothing particularly new about it, it simply revolves around the idea of picking a simple concept and converting it into a small (very small) representation of the life-size one. In this case, I had been sitting in the garden and thought I would try to encapsulate my garden into a pendant tray. Yes I could have taken a photo and set it under a cabochon, but I really wanted a diorama effect. So I gathered my materials:
and went about the making of the piece. I had:
- ModPodge
- a pendant tray
- a hollow glass dome
- a piece of backing paper from a scrapbooking set
- a detailed scrapbooking paper sheet
- scissor, brush, pointy tweezers - and not in the photo, but they were nearby, a set of colourful Sharpie pens
Firstly I glued the blue backing paper into the tray. I had traced around a bigger piece using the glass dome and cut it to size so it would fit the tray. As it had a slight wave pattern and I wanted it to sit straight, it needed a bit of gentle manouvering into position.
I then applied glue to the bottom border and glued on the nicer and greener bits of moss I found.
With another coat over the bottom of the moss itself I was able to add a second layer for depth.
I had picked the larger scrapbooking paper because it had some teeny tiny butterflies and ladybirds that I could cut out - easier said than done! It might have been better to use an X Acto knife here as the detail was just too much for my huge ploddy scissors. Alas, we did what we could. These tiny paper insects were then folded slightly for a slight 3d effect and glued into position in the tray.
Hmm, not quite right. The insects looked washed out and the paper could be seen through the rim of the glass. Resort to Sharpie help. Coloured pens gave the insects the extra burst of colour I wanted, and a quick go around the edge of the background paper with a black pen meant any paper showing would not be visible around the edge of the glass. Of course I needed to push the moss into the tray a little bit to allow the glass to sit nicely at the very edge.
Let everything dry for a good day or so. As all the bits of glue dry, if you pop your glass top onto your piece too soon, you will find droplets of condensation form soon after.
When dry, I dabbed a little ModPodge on the rim of the glass - this glass is very fragile and so it won't be subjected to many knocks and bumps. I believe ModPodge will be strong enough for the job, but if in doubt, you can use E6000. Place it gently onto the piece, ensure there are no stray bits of moss escaping and there you have a cute little diorama piece.
Sweet!
Saturday, 18 August 2012
Sticker Love
We continue to be full of love for all our stickers - have you seen the latest offering?
19mm stickers on our new round lockets.
The cherries are my favourite.
16mm squares on our square cufflink fittings, which now come in all colours!
Super cute pendants made with our stickers - these come in a new size: 20.5mm.
Adorable, huh? We only have these new locket rings in limited quantities - be quick! New size of sticker to sit on top: 13mm.
Ah, my favourite - a quirky key ring for the home, made with our big hearts and a resin sticker. We don't have any pretty keys to our house so the key above is a jewellery charm!
Have fun everyone!! :D
19mm stickers on our new round lockets.
The cherries are my favourite.
16mm squares on our square cufflink fittings, which now come in all colours!
Super cute pendants made with our stickers - these come in a new size: 20.5mm.
Adorable, huh? We only have these new locket rings in limited quantities - be quick! New size of sticker to sit on top: 13mm.
Ah, my favourite - a quirky key ring for the home, made with our big hearts and a resin sticker. We don't have any pretty keys to our house so the key above is a jewellery charm!
Have fun everyone!! :D
Labels:
Epoxy Stickers,
Ideas,
My Makes,
New Items
Tuesday, 17 July 2012
Fab New Buttons Now In!
We have just received a shipment of fabulous new self-cover buttons in lots of sizes: from a diddy 12mm on to 15mm, 19mm, 22mm, 28mm, 38mm all the way to a huge 45mm! See them all here: http://www.jasminstudiocrafts.com/category/jewellery-buttons
These 38mm beauties fit perfectly inside our 38mm trays!
And this is a 12mm button inside a 12mm ring bezel
And for the other sizes, findings with a pad are ideal....
...see?
Really easy to make. And you can choose between flat backs or wire backs, with or without making tool, so you only need to buy the tool once for each size. Try them and be hooked!
Tuesday, 27 March 2012
Loving the New Stickers
I have spent a few days having fun with the new sizes of stickers - here are some examples of what I have made:
Here I have simply scanned and printed the pages from a dictionary and used our fab 25mm circle cutter to cut a perfect round to fit seamlessly into the tray. So many inspirational words, we just couldn't choose!
This one is destined for a rectangular tray
Here I used a vintage Japanese printed image and as the sticker was very slightly loose inside the 30mm tray, I have painted in a black border so it looks like it's part of the edge of the picture.
I love these vintage French cheese pictures! They are actually scanned labels from the tops of camemberts and other round cheeses that come in wooden boxes. So pretty!
Now, this handsome chap is accompanied by another handsome chap:
...and they are both joined by another handsome chap:
...and they are all perched atop the new 30x40mm oval acrylic bracelets, showing off their handsomeness under the new oval stickers of the same size. It literally took about five minutes to make this bracelet, from start to finish, and it looks truly stunning in real life!
Digital downloads from Digitalya, Piddix, HarmonicaGoldfish and PlumBlossomStudio, all via Etsy.
Saturday, 24 September 2011
Make Your Own Buttons!
Add a new creative twist to your jewellery with our lovely button making kits now available in the shop.
You start with two pieces of metal and end up with a beautiful button that is covered in the fabric of your choice. The buttons are available in a choice of sizes, 15mm and 22mm:
and two versions: flat back and wire back.
The flat back buttons are ideal for gluing onto rings, earrings, hair pins and pendant findings, and the wire back buttons are perfect for stringing and for threading onto hairbands.
These buttons come with a making tool for assembling your buttons (each size of button needs a different tool, but different backs can be used with the same tool as long as the size of button is the same).
To make your pretty buttons just pick some fabric – thin fabric is best – and cut a circle that’s about 1-1.5cm wider than your button.
Pop the fabric onto the white part of the tool, pattern-side facing down, and sit your button over this, ensuring that any pattern is centered in the position you want it to be (this can sometimes be a bit tricky!). Then, with the red bit of the tool, press down into the white bit so that the fabric and button top are snug inside the white part of the tool.
Bunch the fabric back into the button
place the back of the button on top, ensuring it is perfectly centered
and with the red bit of the tool again press down hard so that it fits right inside the button.
Finally, pop the button out of the tool, and there you go, a perfect button that you have made yourself!
If you have chosen to use flat back buttons, you can simply glue these into place onto rings and hairpins or simply add a magnet, pin or tiny brooch back.
To use them with pendant trays, you may have to apply your glue to the edge of the button rather than to the metal back. This is because there is a 1-2mm edge where the button sides are higher than the back, so sometimes you may have to add a riser so that the back is flush with the edge so for certain applications this would be useful. You can use a rubber pad, washer, or a foam sticker (as used in card-making) – just ensure your glue is a strong one.
I have used a small riser on the hairclips above, however for items such as rings and hairpins, a riser should not be necessary.
The 15mm flat backs fit beautifully into our 15mm bezel trays, and we are investigating offering 22mm trays.
The wire back buttons have a loop at the back so that these are essentially your traditional buttons and these can certainly be used as such! Or you can also add them to hairbands – all you need to do is thread the elastic (doubled up) into the loop, and then knot it over itself. Simple! And if you use the metal fastening on the elastic at the back of the button you will have a secure tie and the metal won’t show. See pictures below for a guide:
The best fabrics to use are thinner ones, cottons and linens are ideal. Look at Japanese fabrics for beautiful designs that are little enough to use on a button, or the tiny patterns available in dollshouse shops, or use just a little detail from a bigger pattern fabric.
If you want to be totally original, consider printing your own fabric – I usually use heat-transfer paper (for printing on t-shirts) for my own designs.
Most of the above buttons use vintage images from my collection which I have printed onto heat transfer paper, and bonded to thin fabric. Or if you wanted to do this on a slightly bigger scale, consider using a fabric-printing company who will print short-runs of fabric for you to your design.
The use of fabric lends a wonderful handcrafted feel to your jewellery, whether classy or cutesy, it’s very pretty indeed!
Subscribe to:
Posts (Atom)