Wednesday, 28 March 2012

Here's a New Idea - Word Necklaces

How about making some fab new necklaces for spring?   I felt the need to make something, and I did not have much time - so I opted to use epoxy stickers, which look great and are really really easy to use.

I gathered my materials:
  • epoxy stickers in 12mm and 15mm sizes, 
  • silver plated charm blanks also in 12mm and 15mm,
  • ModPodge, scissors, printer, laptop! 
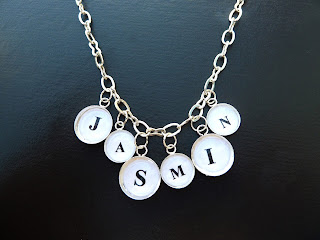
First I printed out a sheet with everyone's names written on it, in capital letters with big spacings.  Here I am showing you the necklace I made with my own name (part of a set I was making), and obviously you will need an adequate number of stickers and trays for the length of the names or words you are preparing.


I wanted to make these necklaces with a mix of big and small trays and found the 15mm trays went well with a 24pt font size and the 12mm ones suited the 16pt size nicely. 


Once printed, I just centred the stickers over the top of the individual letters - I went for a big-small-big-small pattern, but you could do this differently.


Then I cut around the letters to make reasonably tidy circles (!), and simply ModPodged them into the trays.    Finally, I used jump rings to join the trays in sequence to every second link in the necklace chain, and it was all done!   Really easy, it took ten minutes in all, and everyone was really pleased with their necklace!


Love it!


Below I made a slightly different necklace - firstly I used printed images instead of letters, or rather, the leftover borders from some images I used on another project.  I used the same stickers and same charm blanks but a different chain.


And the beauty of this one is that as the chain is smooth without links (much like ball chain or snake chain), all the charms dangle together clinking as you move, making this a lovely playful piece.


And just because I had some of the little flower print outs, I made some earrings using our new vintage copper ovals and matching 13x18mm stickers.  Easy!


Have fun making!!

Tuesday, 27 March 2012

Loving the New Stickers

I have spent a few days having fun with the new sizes of stickers - here are some examples of what I have made:


Here I have simply scanned and printed the pages from a dictionary and used our fab 25mm circle cutter to cut a perfect round to fit seamlessly into the tray.  So many inspirational words, we just couldn't choose! 


This one is destined for a rectangular tray


Here I used a vintage Japanese printed image and as the sticker was very slightly loose inside the 30mm tray, I have painted in a black border so it looks like it's part of the edge of the picture.


I love these vintage French cheese pictures!  They are actually scanned labels from the tops of camemberts and other round cheeses that come in wooden boxes. So pretty!  


Now, this handsome chap is accompanied by another handsome chap: 


...and they are both joined by another handsome chap:


...and they are all perched atop the new 30x40mm oval acrylic bracelets, showing off their handsomeness under the new oval stickers of the same size.  It literally took about five minutes to make this bracelet, from start to finish, and it looks truly stunning in real life!  

Digital downloads from Digitalya, Piddix, HarmonicaGoldfish and PlumBlossomStudio, all via Etsy. 

Thursday, 15 March 2012

Sizing Issues

Those of you who use our glass or stickers and trays regularly will already know that sometimes there are very slight discrepancies in size - all our items have a small percentage of tolerance by which they can vary, this is normally fine and unnoticeable, but sometimes you find that you get a piece of glass or a sticker that feels a bit loose for the tray.  This happens more often than the other way round, it would be disastrous if glass was always bigger than the tray therefore the insert is usually made just a notch below the specified size, so even a small discrepancy in size should not normally make it impossible to fit the glass or sticker into your chosen bezel.

What is a lot more common, however, is that sometimes the insert can feel slightly loose in the tray, and often, especially if you use silver plated trays, you can see the back of the tray next to the glass and it doesn't look very appealing. See here my earlier attempt with one of our brand new oval stickers - can you see the base?


The best way to correct this is very simple - just grab a black permanent marker, and off you go!


Paint the visible edge of the tray:


All the way around:


And paint the edge of the paper, taking care not to go over the sticker or glass:


And there you have it, a lovely finish!