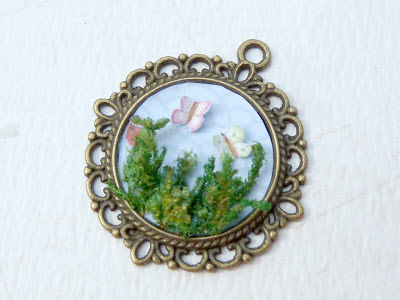
So you will have already seen these amazaroola new hollow bowls. They are delicate, they are fragile, they have a lovely handmade feel about them. They will serve to encase your precious mementos, your artistic little sculptures and a myriad miniature worlds.
We have come up with several ideas for them already, but we must pace ourselves. So we bring you just one little idea, nothing particularly new about it, it simply revolves around the idea of picking a simple concept and converting it into a small (very small) representation of the life-size one. In this case, I had been sitting in the garden and thought I would try to encapsulate my garden into a pendant tray. Yes I could have taken a photo and set it under a cabochon, but I really wanted a diorama effect. So I gathered my materials:
and went about the making of the piece. I had:
- ModPodge
- a pendant tray
- a hollow glass dome
- a piece of backing paper from a scrapbooking set
- a detailed scrapbooking paper sheet
- scissor, brush, pointy tweezers - and not in the photo, but they were nearby, a set of colourful Sharpie pens
Firstly I glued the blue backing paper into the tray. I had traced around a bigger piece using the glass dome and cut it to size so it would fit the tray. As it had a slight wave pattern and I wanted it to sit straight, it needed a bit of gentle manouvering into position.
I then applied glue to the bottom border and glued on the nicer and greener bits of moss I found.
With another coat over the bottom of the moss itself I was able to add a second layer for depth.
I had picked the larger scrapbooking paper because it had some teeny tiny butterflies and ladybirds that I could cut out - easier said than done! It might have been better to use an X Acto knife here as the detail was just too much for my huge ploddy scissors. Alas, we did what we could. These tiny paper insects were then folded slightly for a slight 3d effect and glued into position in the tray.
Hmm, not quite right. The insects looked washed out and the paper could be seen through the rim of the glass. Resort to Sharpie help. Coloured pens gave the insects the extra burst of colour I wanted, and a quick go around the edge of the background paper with a black pen meant any paper showing would not be visible around the edge of the glass. Of course I needed to push the moss into the tray a little bit to allow the glass to sit nicely at the very edge.
Let everything dry for a good day or so. As all the bits of glue dry, if you pop your glass top onto your piece too soon, you will find droplets of condensation form soon after.
When dry, I dabbed a little ModPodge on the rim of the glass - this glass is very fragile and so it won't be subjected to many knocks and bumps. I believe ModPodge will be strong enough for the job, but if in doubt, you can use E6000. Place it gently onto the piece, ensure there are no stray bits of moss escaping and there you have a cute little diorama piece.
Sweet!


Great idea. I've just received mine in the post so I can try to create a miniature world!
ReplyDelete