
First of all here is a small shopping list of items you will need:
Images (laser prints or professionally printed images on thick smooth paper)
Glass shapes and metal trays of the same size
Craft punch (optional but makes life so much easier!)
Sealant - ModPodge is great
Glaze - Diamond Glaze, Glossy Accents or DG3 are all fab
Strong Glue - E6000 is my favourite
First, you need to choose your images - the fun part. The ones I use here are readymade 1 inch collage sheets by Piddix, Printables and Digitalya. I use a laser printer on thick smooth paper. I find cardstock is too thick for my purposes and can sometimes be textured and porous, and letter paper is far too thin, so something in between is ideal, so long as it has absolutely no texture and is completely smooth. I use a very smooth paper from our printing shop that is upwards of 200 or 250gsm. Some glossy coatings may run once you apply the glaze, so do not use photo paper, try instead to find a plain paper with a slight sheen but without a coating. We can only recommend laser prints for this craft - inkjet inks can often run, sometimes after several days of your pendant looking beautiful it will suddenly look all wrong. Best not to risk it and start with a good print.

(Collage sheet credit to Piddix)


Make sure that the images you will be using are thoroughly sealed with several coats of ModPodge, MicroGlaze or your favourite choice or sealant and completely dry. Depending on the inks on your prints, you may be able to skip this step, you may have to experiment. You will probably find that the laser prints and professional prints (say if you use wrapping or scrapbooking papers) will not need as much sealing as inkjet prints. Inkjet prints will need several layers of sealant before they will be usable. Some inks will run already when trying to seal them! If so, don't despair, switch to laser prints on good paper and see the difference.
Remember you will need to seal the back, the front and the sides! I find it useful to lay my cut outs on a piece of plastic, here I use one of my grip-seal bags which are flexible and sturdy enough for this.

Repeat several times for inkjet inks, or a couple for laserjet inks. Wait until each layer is dry. This could be a day or so ...each! You have to ensure each step is completely dry, otherwise you could have problems later on - can't emphasise this enough!

Not quite ready - wait a bit longer!
Apply a drop of Diamond Glaze over the centre of the sealed image. Don't worry too much about bubbles at this stage.

Press the glass into the wet glaze. Pressing hard will make the bubbles pop out at the edge. You can use a heavy object to press down onto the glass whilst it is drying.


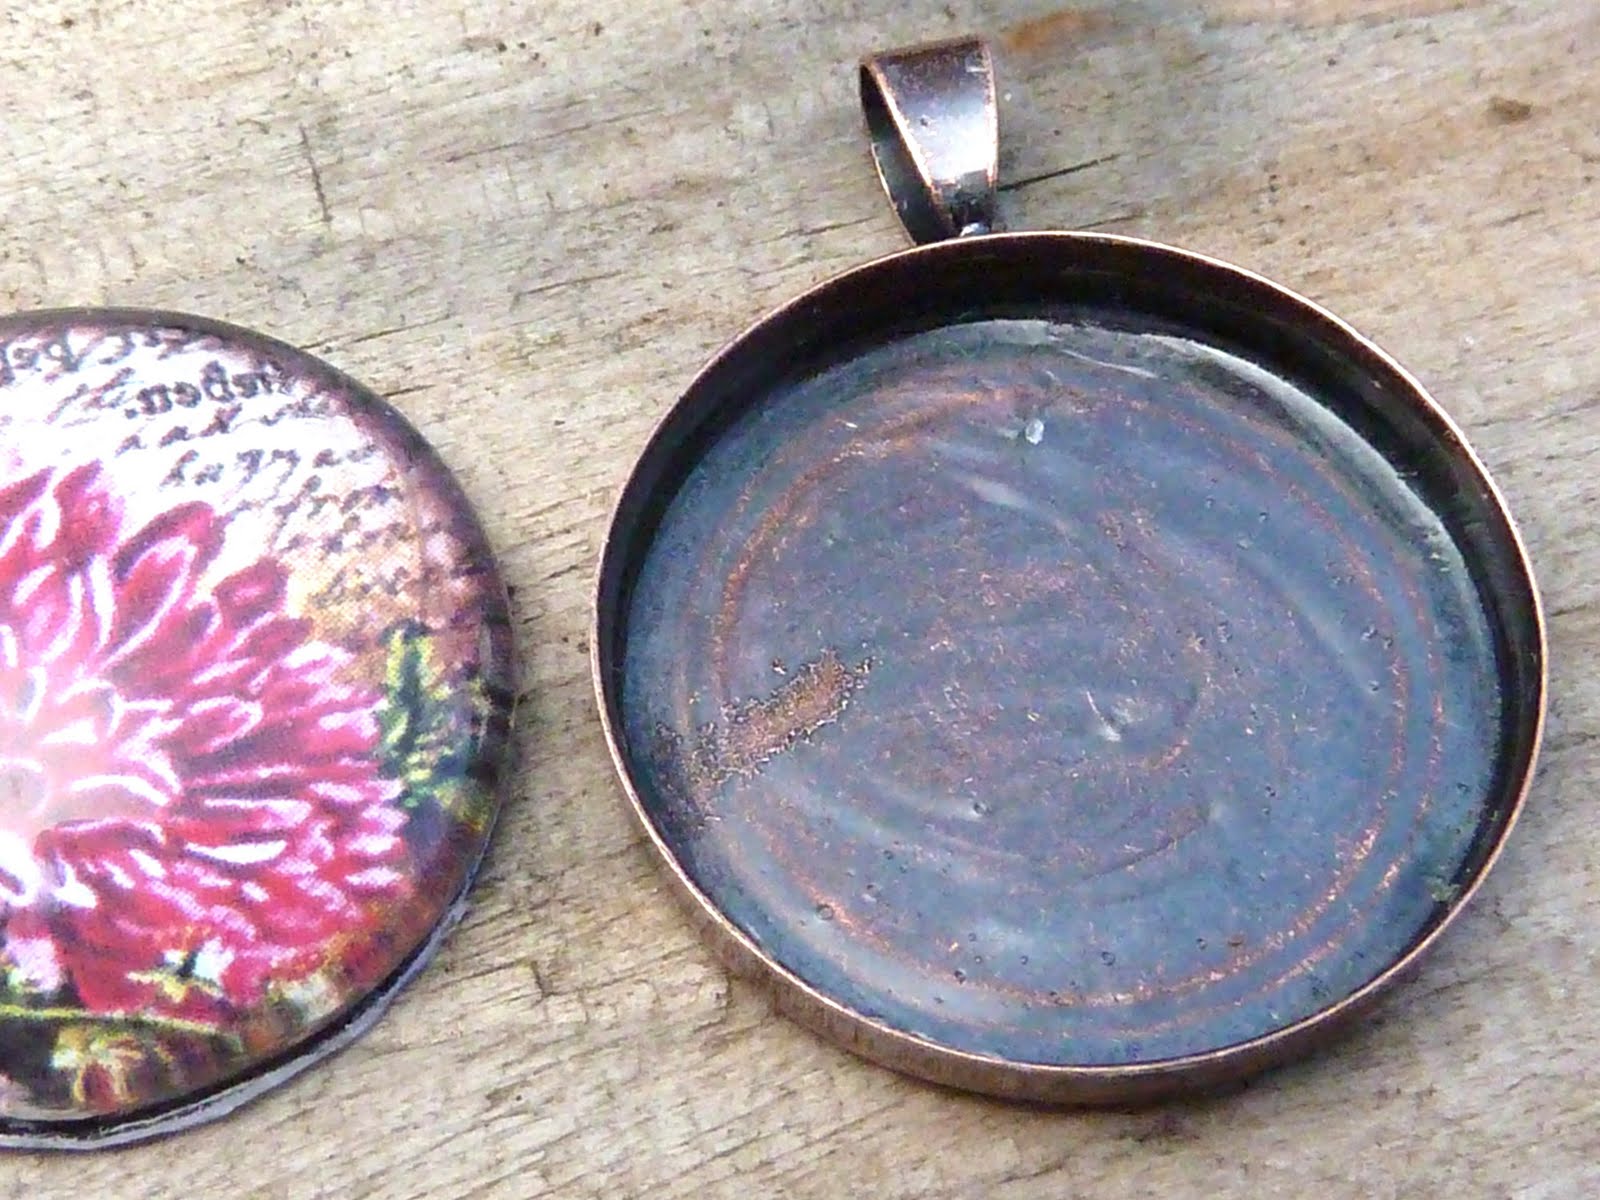
Over the following days, inspect your pieces and if they are completely dry, you can now glue them into your tray. If you have chosen to use any metal trays that are copper, brass or bronze or any antique/vintage platings you will need to coat your tray with a layer of ModPodge as Diamond Glaze has a tendency to react with these platings and turn blue which will give a distinct blue hue to your images.

Apply a drop of glue to the back of the pendant blank - I have used both Diamond Glaze and e6000 successfully here - the key is to ensure your image is well sealed and most glues that are suitable to stick paper to metal should be fine. If you use Diamond Glaze you need to watch that it doesn't wet the image too much, so use a drop or two and ensure the rest is completely dry before you apply it.

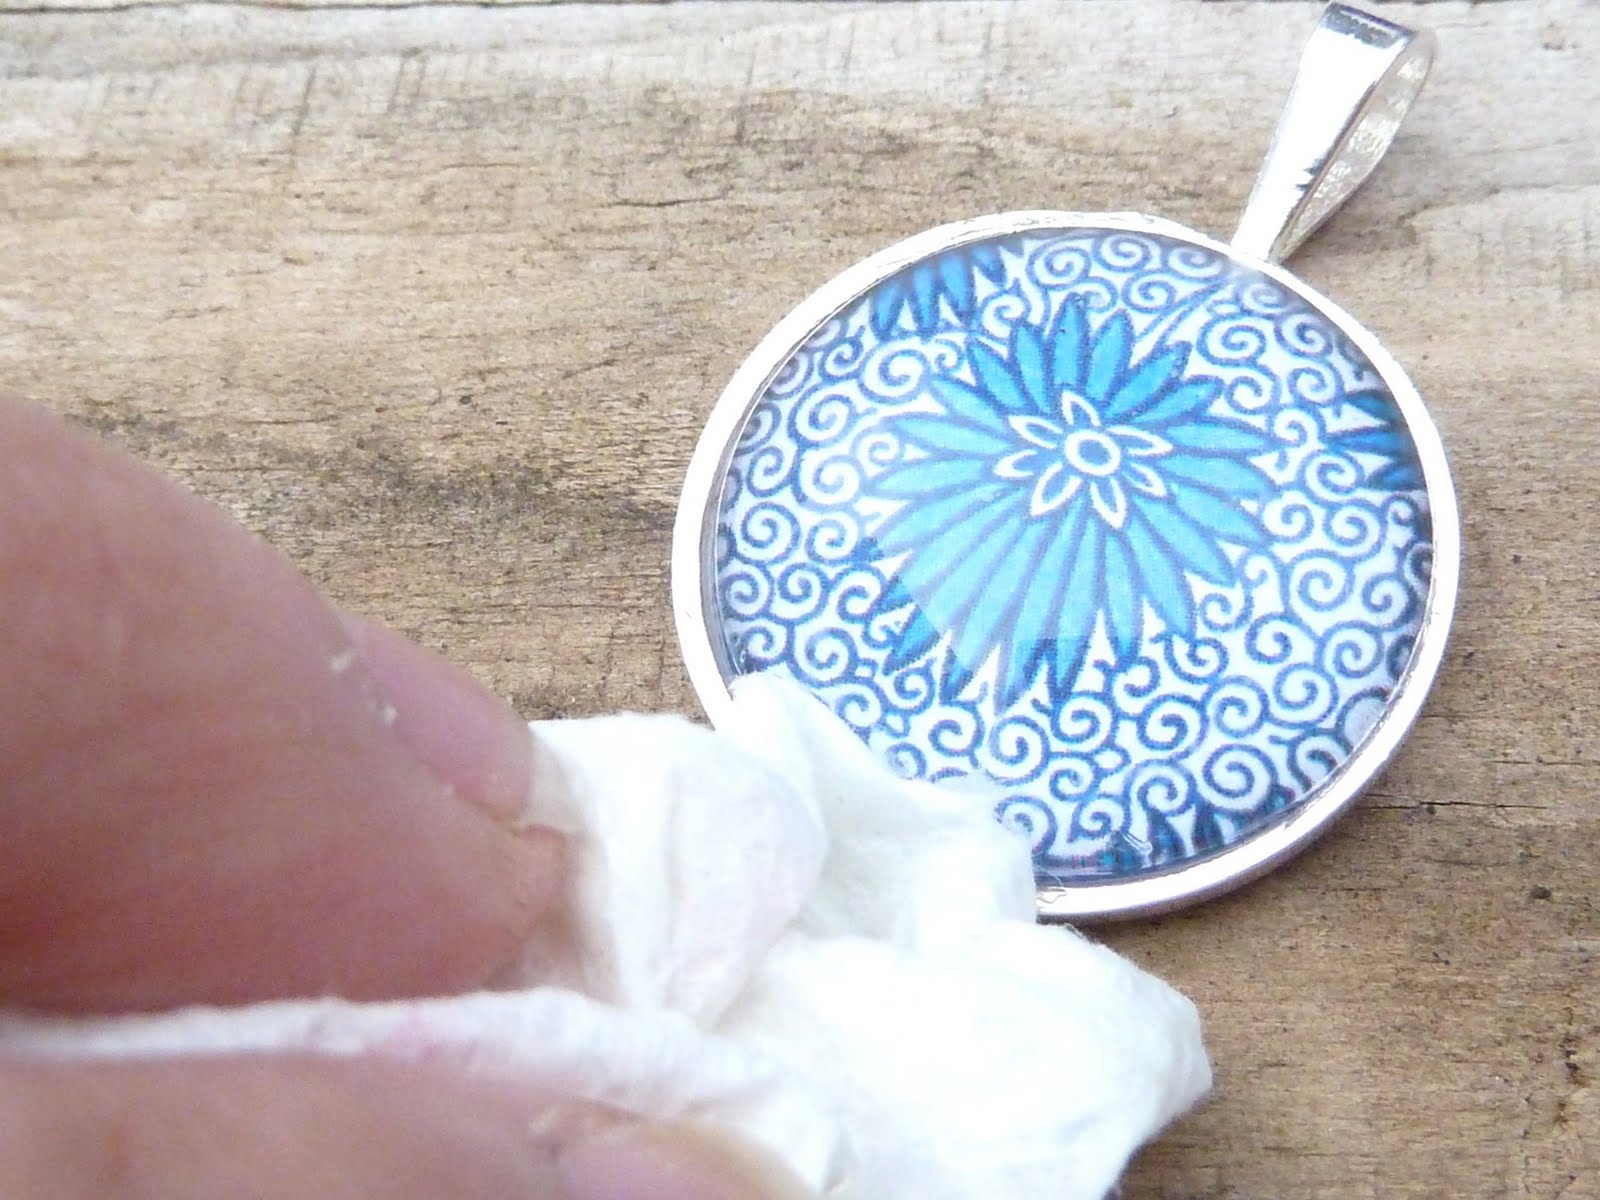
Once you press the glass into the tray you may get a bit oozing out of the sides, so wipe that away with a paper towel and once dry, wipe the glass with a damp cloth to remove any bits of dried Diamond Glaze (which is water soluble even when dry, so whilst this is handy as it will wipe away from the glass, it also means your work will be affected if the piece gets wet, so always advise your wearers not to wet the pieces).


I have used e6000 successfully to glue the glass into the pendant tray, with no effect to the image. Neither will you get any excess out of the sides if you use just enough. However one downside of using the e6000 is that it is very permanent so if you make a mistake you will not be able to re-do the piece, unlike with Diamond Glaze which can be resoaked so that you can start again.


As E6000 is stronger than Diamond Glaze, there is always a risk that it might pull the image away from the glass at points - the trick here is to apply a tiny line of E6000 around the edge of the tray instead of a blob in the middle. But generally if your paper is thick enough, and your work has been dry for some days, you don't need to be too careful.
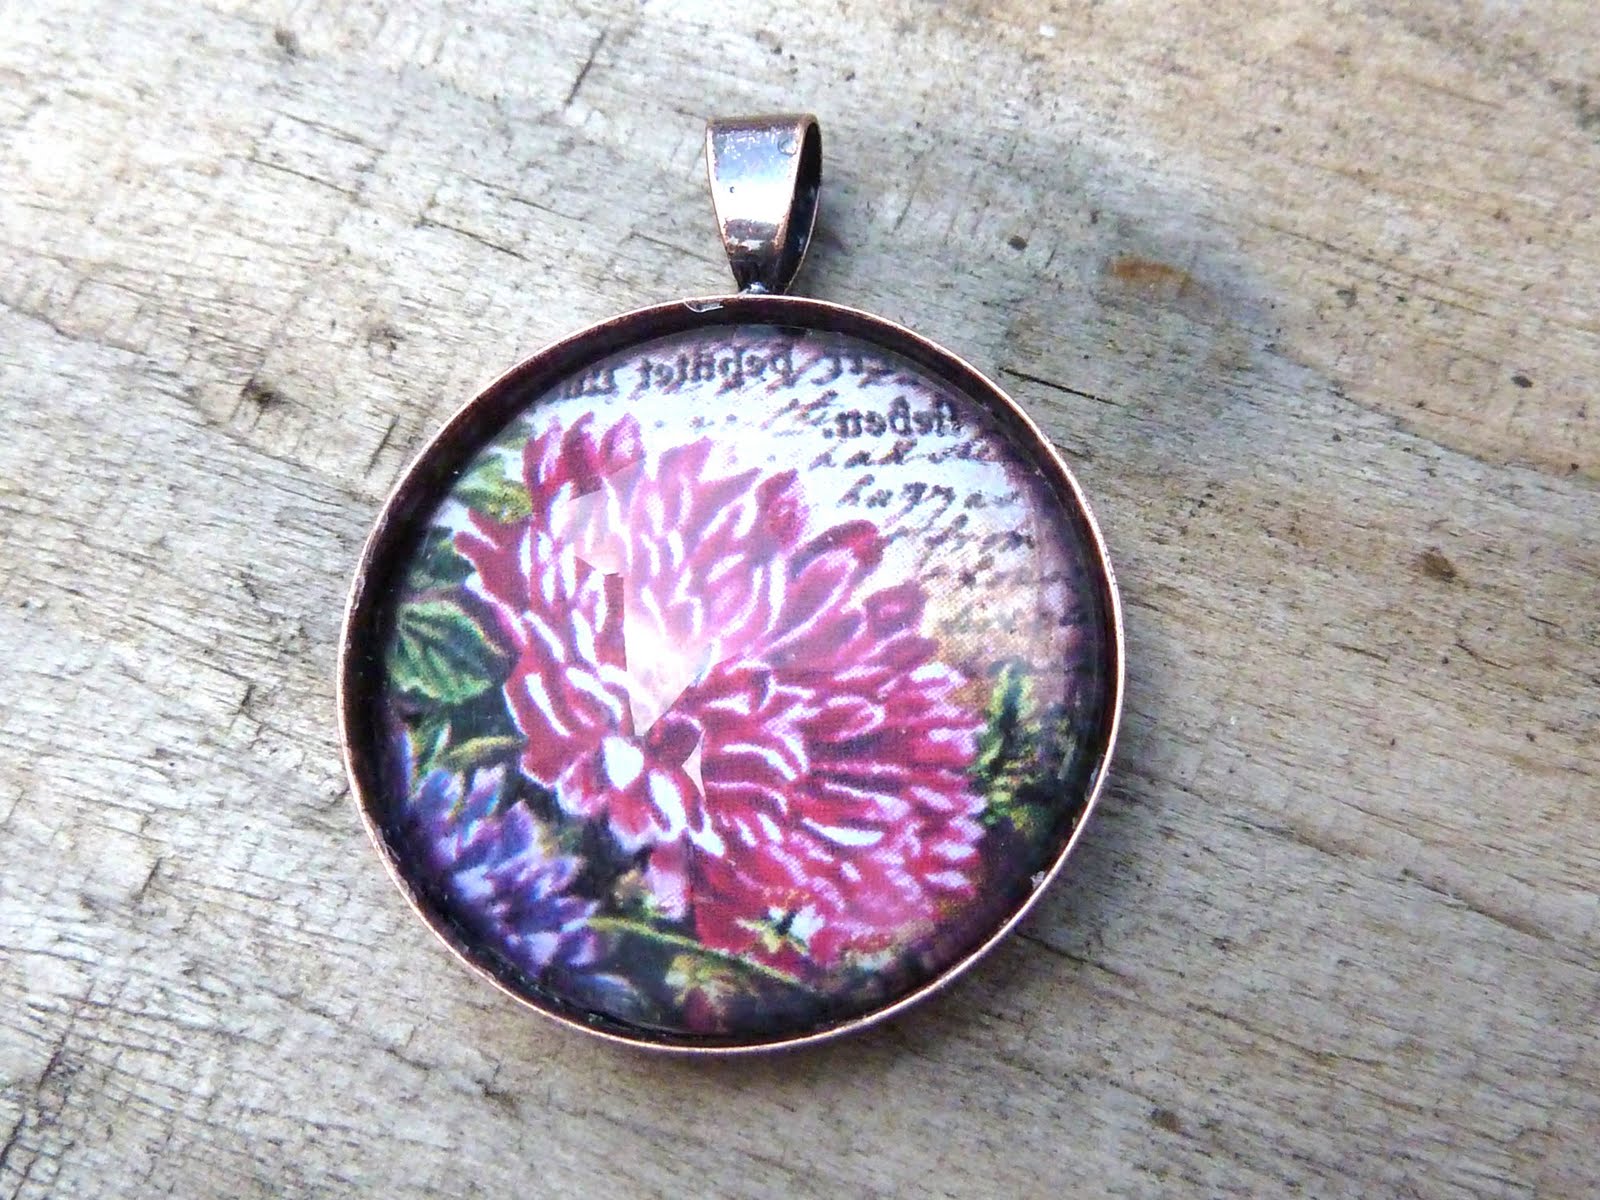
When it has all dried, inspect your masterpieces....


Wear them with pride!


And because you will quite possibly have caught the bug, make more!

Enjoy!!!
(All images used in pendants & ring can be bought at Piddix, Printables and Digitalya.)
love it! Will definitely have to try this soon!
ReplyDeleteHi Jasmin thanks for all your help via e-bay!
ReplyDeletethis tutorial is great I'm gunna keep referring back to it tonight when I'm making my pendants
Cant wait to see what else you add on here :)
I used this method to make some pendants and the pendants dried with a wet look to them?? Not sure why. Since then I've tried the same method but leaving a heavy book on top while they dry. I'm still not having the best results. Any advice for me?
ReplyDeleteHi rcronin, sorry you are having problems - any chance you could send some pics to me at jasminstudio@hotmail.com? I'll be able to advise better then. You may need to wait longer in between glueing the tray to the image and then to the glass, or it may simply be that you could use less glue. Is your paper completely smooth and well sealed? Another thing you can try is adding the glass to the image first, and then a day or so afterwards you can glue it (with very little DG) to the tray. Hope this helps! Jasmin
ReplyDeleteThanks for the awesome post! I just made some cabochon magnets last night but the E6000 is making my image look "wet" under the glass and I'm wondering if it will get more clear as time passes. Any advice regarding the glue? I tried 1st with 1" punches from a magazine and then tried again with some card stock and the paper has darkened under the E6000 : (
ReplyDeleteSaw your response to rcronin, I will wait longer between the gluing and see if that helps. : )
ReplyDeleteHi Angela - yes, first make sure that your glass tile & paper is as dry as poss. Thick smooth paper is good, cardstock can be somewhat porous, so make sure it is well sealed - and you only need a little bit of glue so try not to use too much! :)
ReplyDeleteHi, thanks for the great tutorial! I haven't put your teachings to use yet, as I'm just researching best methods at this point... I just have one question about the stage where you seal the front, back and sides of the images. I have a product called Decou-page by Americana which states that it is a sealer-glue-finish. It says it dries clear. Wondering if you've heard of or have tried this product because I hope it will work as well as Mod Podge? When you place your images on the plastic sheet to dry, does the side that's laying against the plastic tend to dry well? Or do you turn the images over after the fronts have dried? How do you ensure both sides and all edges of the images are completely dry? Thanks so much!! Can't wait to start making these!
ReplyDeleteHi Jenn, yes you do need to seal all sides separately. I peel the graphics off the plastic to seal the other side and the edges. There will probably be lots of dried up glue around it that you will need to pull off or cut around, but it comes off easily. I have all the images sealed completely (and then tidied up back into a circle shape) before gluing them into any trays. Your decoupage glue sounds fine! I'm sure it will work, however, sometimes little nuances in the chemical make up of a glue might mean you get a slightly different reaction, so I can't say with absolute certainty, but I am pretty sure it would work! Have fun!!
ReplyDeleteThank you Jasmin Studio - I appreciate your response!
ReplyDeleteI followed these instructions exactly. For a few days I had a bunch of wonderful necklaces, but when I checked them this morning, half of them were ruined. It looks like the ink has run, even though they were professionally printed, and completely sealed. Any idea why this would happen? I'm really gutted.
ReplyDeleteHi Nooka, sorry it didn't work for you. It sounds to me like they might have been assembled before each component had dried completely or too much glue was used inside the pendant so it re-wet the image. Did you also seal the back of the images? If you want to email me more details I'll be happy to pinpoint what the issue could be. In the meantime, pop the necklaces in a bowl full of water and in a day you should be able to prise the glass away, clean the image off the glass and start again. Regards, Jasmin
ReplyDeleteI've got 30mm trays and can't find a 30mm craft punch anywhere. Do they exist!? Thanks : )
ReplyDeleteHello CBMT, I'm afraid I haven't come across a 30mm punch yet, but if I do, I will post about it here!
ReplyDeleteNice tutorial thanks for sharing
ReplyDeleteHello, I have done this glass pendant several times. It look fine the first 2 days. But after 3 days, I have bunch moisture, like water drops inside my glass pendant. What did I do wrong? I am so discourage. Diamond glaze ruined so many of my pendants with water inside the glass tile. Help.
ReplyDeleteHello, I tried this method of making my pendants, but I also find them ruined after 2 days. Then I figured that my glue is water based and I use inkjet to print my image! So I use e6000 to attach the glass to my graphic and it looks fine. My main concern is the toxicity since I use e6000 for just about all parts of the process making the pendant. Any thoughts? Thanks!
ReplyDeleteHello Abellagifts - I am sorry, I had replied to your note, but my post has vanished!
ReplyDeleteDon't be discouraged, first of all, soak your pieces in warm soapy water and you will be able to start again. I recommend using really good thick laser-printed paper, very little glue, and if you are still having trouble, try drying your pieces on a hard surface with a weight on top. It sounds like this may be a case of too much Diamond Glaze being used which dries around the edges and not in the middle, or assembling the items without letting them dry first.
It might help to wait a while for each step to dry before assembling - lots of people pop the image/glass combo into the trays right after gluing them together, and that will almost always not dry correctly - give it a couple of days to make super-sure.
It's always worth experimenting before using your good pictures, so try with some scrapbooking paper first so that you have the reassurance that you have the process down to a T.
I hope this helps!
Hello ARTshell, ohhh I had never heard of E6000 being used to stick glass to paper - I will have to try this! I would imagine that even if it dries clear however, it might become a little expensive if you make lots of jewellery, as you get quite a bit less for your money than with Diamond Glaze. I am glad you found a method that worked well for you however, because you are quite right, Diamond Glaze can be a bit tricky sometimes.
ReplyDeleteIn terms of your question regarding the toxicity of E6000, absolutely, in its active state it is a nasty thing, so always work in very well ventilated areas and do not allow it to come into contact with skin. I believe it is the case with glues that once dry, they become inactive, however I have passed your question to the manufacturer for a more accurate reply and will post it here once I receive it. In the meantime you can consult the MSDS here: http://eclecticproducts.com/_msds/e6000_english.pdf
Thanks for getting in touch!
Hi I'm a new follower of yours. I love this idea :) I found your blog when trying to find out how to make them using my images. You've been so much help so far thank you!
ReplyDeleteI've got as far down the shopping list as Diamond Glaze, got some of that, but I'm stuck on ModPodge. Do I need to get Glossy or Matte? I'm confused about this and don't want to waste money on the wrong one. Which type of ModPodge did you use?
Hi Cerian and welcome! Either Glossy or Matte ModPodge will work for this - they both look clear under the glaze and you can't really tell the difference between the two. However ModPodge is a very versatile product so if you were thinking of using it for anything else (such as decoupage for instance) then you might prefer one over the other. You can find out more about ModPodge and what you can do with it here: http://www.plaidonline.com/mod-podge/brand/home.htm
ReplyDeleteI want to use photographs to make some pendants. What paper should I use? I usually get my photos printed at shutterfly.cm or the local pharmacy, will those places be ok? Do you have a link to where you buy your paper?
ReplyDeleteThanks
Lesley, I make portrait pendants (a ton) using my own prints and I get the Canon matte photo paper from Staples and print with the "high quality" option on my printer. When you're getting your image ready, just open a Word document, put your picture on and then resize to what you need. It's a pain trying to get just the right size for your pendant blank or tile if you are not printing them yourself.
ReplyDeleteThanks Jill! Are you using an inkjet printer? I have a canon printer but think I only have glossy paper so I will head to staples tomorrow to get matte paper. I actually wuld prefer to print from home anyway b/c when I want to work on a project I don't like to wait :) Do you do anything special like the microglaze to protect the photo.
DeleteI only asked b/c I tried these pendants once before and had not so great results. Everything I find online is so mixed.
Hi Lesley, sorry I missed your post! I would recommend using a laser printer over inkjet as inkjet inks have a tendency to run and need careful sealing with something like ModPodge. You can take your resized images to your local printing shop and ask for them to be printed by laser printer on the thickest smooth paper they have. Photo papers vary hugely in how they behave with this craft so as a rule I don't generally recommend using them - the matte papers can be ok, but glossy papers in particular react with the glaze and can make your images blur.
ReplyDeleteGenerally with good thick paper and a good laser print, you can get away with little or no sealing, which earns you time - however, you will soon find your own favourite materials and methods, as Jill has found, as you seek a good balance between using your own equipment and materials or professional ones.
I hope this helps!
Thanks so much. I think I am going to try both methods as you suggest since they are both different than when I tried before and see what works best. I believe the first time I did these I used an ink jet printer on glossy paper, and tried triple thick glaze and clear nail polish to seal and neither worked very well.
Deletehi everybody ,
ReplyDeleteI also try to maken glase tile pendants but I have a problem with airbubbels.
Instead of diamond glaze I use mod podge dimensional glaze could this be the problem.
Initially the pendant looks nice but after 3 days I get airbubbles everywhere.
eve xxx
Hello!
ReplyDeleteI print all of my images on card stock from my inkjet printer. I let dry for 1 day, then I take it outside & spray BOTH SIDES of the cardstock with a clear sealer (I have used several clear spray sealers & they have all worked equally well...currently I am using Valspar Clear Satin Sealer from Lowe's). I spray twice to ensure a complete seal. I let the cardstock dry outside...sometimes up to couple of hours. The cardtock sheets try to blow away...so be careful with that, too!
Then I cut the images out. I place a few drops of diamond glaze onto the image & press the glass down onto the image. I am careful to center the glass onto the image just right. Then I push down....HARD. Then while still pressing down I take a toothpick & ensure that all larger bubbles are away from the edge of the glass & image to ensure a good seal. Then just hold the glass down. If you stop pressing down too soon all the bubbles you pressed out will be sucked right back under the glass. So press down hard for about 30 seconds (be careful not to shift the glass around while pressing down). Then I set something with weight onto the glass to allow it to continue to dry. Since I also sprayed the back side of the cardstock with the sealer the e6000 glue does not cause a problem by soaking through the image.
I hope this helps!
Hello Eve, hello Lindsey, and welcome!
ReplyDeleteI'm sorry you are having problems, Eve. ModPodge Dimensional Glaze is not a product that is easily available in the UK, so I'm afraid I have never tried it. However it does sound to me that Lindsey has the answer - if your paper is well sealed, bubbles will not seep through from behind the paper, plus a heavy weight will ensure the paper and the glass adhere at every possible point on the surface. Try it and see how you get on! Thank you Lindsey! I have heard of lots of people using clear sealer sprays successfully, I'm glad to learn it works well on inkjet prints too!
Jasmin
I've been having the same problems with shiny spots/air bubbles after I glue them into the trays (usually 2 days later). I've been putting the E6000 in the centre and spreading it out. I've tried Glossy Accents, Sun & Moon glaze and Diamond Glaze, all with the same outcome. Will try letting them dry longer before putting them in trays (I usually wait 12-24hrs).
ReplyDeleteHi,
ReplyDeleteI'm doing pendants with custom silhouettes for a while, using diamond glaze.
I print my images on a professional photographer -kodak glossy paper.
I made a lot for xtmas gifts, but recently I had a new problem.
After 2 days...my black silhouette turns red. Anyone had the same problem?
I'm using the same material/pendants, glue, glass....
It is so annoying!
kiss from Portugal
Ana
Hi Ana, try not using photo paper, and switch to laser printed smooth thick paper instead of 250gsm. Also, ensure you seal your images thoroughly - they should feel quite smooth and plastic-y and that will ensure the glaze does not come into contact with the ink.
ReplyDeleteHi Darkhalf - are you using particularly porous paper? if so, it will need several coats of sealant. Also, use only a little E6000, and if you find it pulls the paper from the glass, use a few tiny dots applied with a toothpick around the edge of the tray. Hopefully that will help.
Kind regards, Jasmin
Have you had trouble with lines in your pendants when doing this? I seem to keep getting lines that seem to be the brush strokes from sealing my images with mod podge.
ReplyDeleteHi,
ReplyDeleteI am having the same issues and I am using a sponge applicator.
Thanks for sharing your amazing blog. I finished this right now and thinking that it is the perfect blog I was looking for . Never stop writing, and keep up such an informative blogs. Best wishes for you.
ReplyDeleteGlass Tile
Hi. I used to glue my glass cabs into the pendant settings using Mod Podge. I've never had a problem with this but lately I've worried that it isn't strong enough. So I've switched to E6000 glue but I've had mixed results. Some of my pieces turn out fine but others develop a brown "staining" on the image and/or bubbles. I seal my images thoroughly and usually wait 24 hours after attaching the glass cab to the image with DG. From reading the above I can only assume I'm using too much E6000 and/or not leaving my cabs to dry for long enough. So I will try again.
ReplyDeleteThanks, Louisa
Hi Louisa...I have the same problem with E60000 glue :( bubbles or staining. And I seal my images too
DeleteFrustrating, isn't it?!
Deleteit's frustrating and annoying ...
Deleteand it's like ... the more I do, the more problems I see :(
Hi both - I think the problem may lie with the paper not being thick enough, or perhaps applying too much e6000. It really only needs a thin line along the corners - try applying it with a toothpick - but firstly make sure that the paper you use is as thick as possible, or if that can't be, then ensure you seal it several times over so it resembles a hard piece of plastic. Incidentally, for anyone wondering, E6000 is not suitable for gluing a cab to an image, just for gluing an insert to the tray!
DeleteHi! I am getting flecks in the picture after applying the cab to the image. Suggestions?
ReplyDeleteI get the shiny spots under the glass as well. I have sealed the paper with Diamond Glaze, Modpodge and nothing works. It's not on every one but on wayyy to many. Getting images printed at OfficeDepot on white matte stock paper. Pretty tired of having to redo. Any help is appreciated.
ReplyDeleteYay! I had no idea that I could soak these in water (I used warm water for quicker results) and redo them! The first three I made turned blue b/c I used too much Diamond Glaze, and had I known that I could take them apart, I'd have remade them. I was making a special custom pendant for someone, and it must've been too humid, b/c the image pulled away from the glass around the edges. I also need to remember to cut the image out before I glue it to the cabochon. This is,by far, the best tutorial I've read, and I thought I'd read them all! :)
ReplyDeleteMy issue is that the piece looks cloudy after a few days. Fine when it goes into the tray, but then after a day or two, it's like there is contact with the ink but I have well-sealed it. Confused and frustrated.
ReplyDeleteHi!
ReplyDeleteThis is the most helpful tutorial I've found, I made a few pendants before I read this and experienced many of the problems (image turning blue and bubbles) I have just one question, can you seal the tray with anything other than mod podge? (such as PVA glue etc)
Thank you,
Sarah
I had to spray mine with Krylon preserve it before I used the glue. It needs to dry for 24 hours. This is the only way mine would not run. It takes a good 4 to five days for them to successfully dry without smearing. I was able to make a couple in 2 days with the spray. I had to order it.
ReplyDeleteExcellent tutorial, thank you so much Jasmin. I guess only here I am going to get more help. My problem is: after I glue cabochon into the tray then after 1 or 2 days, I get silvery streaks and shadow like patches on the image. I am getting mad. I do everything like coating the image with water based napkin glue on both sides of the image. I let it dry for 2 to 3 days. please heeeelppppppppp! thank you so much again.
ReplyDeleteHello and welcome! The silvery streaks are an annoying problem - I agree! The best way we have found to prevent them is to apply a heavy weight to the cabochons whilst they are drying, and later, when you set them into a tray, just run a thin line of strong glue around the outside edges of the tray, not a drop in the middle. We suspect that the silvery streaks are to do with the glaze separating from the glass, so it helps if you make sure that you have a strong and even bond in the first place, and that the second glue (generally being stronger than the first) doesn't pull the paper away from the glass. If the problem continues after this, I might look at changing from the napkin glue to ModPodge which gives a really good seal. Also, which glaze do you use? we love Diamond Glaze and Glossy Accents and have made some lovely pieces with silicone glue. Oh and one final thing, try to make sure the back of the cab, the surface that the glaze will stick to, is always really clean (for example hand lotions will easily ruin a good effort!)
DeleteWe hope this helps!
I am having a heck of a time. I've been making image pendants from my painting for several years, using an epson printer with claria inks. No problems. I got a new printer a month ago. Also an epson with claria inks. I've changed nothing else. Same box of paper. Same bottle of diamond glaze. Same everything. But now I'm getting sprays of air bubbles on most of them. I've tried sealing the prints with modpodge, beacon fast finish decoupage, and acrylic matte varnish. I've tried less glaze, more glaze, more pressure, less pressure, holding the glass down longer, not as long, firmer. Everything I can think of.
ReplyDeleteI got so desperate, I tried laser prints but I have other problems there. If I seal with modpodge or acrylic varnish, I get bubbles. If I don't, no bubbles but the diamond glaze isn't adhering right--the print can be pulled away from the glass without too much effort.
Seriously at my wit's end.
Hi Laura, sorry to hear of your problems with this - I can't think what it could be other than perhaps some changes on the manufacturing side of either your printer or the inks... You say you have changed nothing other than the printer? I'm suprised that you get bubbles when using ModPodge - how thick is the paper you use? Bubbles need to find a way in through the paper in order to settle under the glass, so perhaps it needs a few more coats of ModPodge. We find three coats on all sides works for us on most types of prints, but if we use a laser printer, we often get away with not sealing at all. The print pulling away can often be because either the surface didn't make full contact when drying or a stronger glue has been used behind the paper to adhere to a tray - if that is the case, you could try just using a tiny bead of glue around the edge of the tray, not right in the middle. Do let us know if this helps!
DeleteHi Jenn,
ReplyDeleteI just discovered your website and I love it! I wish I had found you years ago. Up until now I've been making my own glass tile pendants for myself and friends like this: 1. use Mod Podge to glue the image to the bezel; 2. Seal the image with more Mod Podge; 3. when dry glue the glass to the pendant twith E6000. I've had a few throwaways (mostly due to ink running) but good results about 95% of the time that way, and I made my first pendant three years ago. Now I've been approached by a local band I'm quite fond of with an offer to make pendants with their logo. And all of a sudden I'm having air bubble disasters! So I've got some images in production now that I've prepared following your instructions. Tonight I'm going to glue them to round glass cabs with Diamond Glaze. I hope they turn out well! Thank you so much for your helpful tips and suggestions as to what can go wrong and how to alleviate/fix problems. I think it was sheer dumb luck that I've gotten OK results for so many years up until now, but then this is the first time I'm going to be (hopefully) paid for my work.
Thanks for the tips, I make these too! I will try sealing my photos first with the glaze, I get that silvery crazing in mine sometimes!
ReplyDeleteHi Heather, we find the silvery shadows are minimised when we apply a heavy weight to the cabs during the whole time that they are drying. Also, best to go easy on any glue you use behind them (say to glue into a bezel) - this is because sometimes this glue will be stronger than the glaze and can make it 'crack' and separate the image from the glass. Hope this helps! :)
ReplyDeleteHello,
ReplyDeleteI hope you can help me.
I have been making pendants using my photography, and I get the images printed on matte paper at photobox. I have been using modpodge to seal front and back of the image, and diamond glaze to attach the image to the cabochon. It's taken me a while to learn how to rid the air bubbles, but I seem to have found a way way that works for me. I move the glass around in a circle to help move air bubbles to the side and then apply pressure. I I then leave them to dry underneath heavy books so the pressure remains.
The problem I am having tho is when place the dried Cabochon with attached image into my cameo pendant. I am using E-6000 and at the time it looks great, but after a few days silver lakes appear all over my images :( before using the E -6000 the cabochon is fine. Should I use a different glue?
Hi Justine, yes, we've also had that happen before - we think it is to do with the E6000 being so much stronger than all the other glues, that when it dries, it pulls the paper away from the glass and into the tray. We have tried different ways of dealing with this, and the method that works best for us is to just run a bead of E6000 around the inside edge of the tray, and none in the middle. As this glue can be tricky to handle, we just pop a drop of it onto a piece of scrap plastic and then use a toothpick to make sure we apply the glue just along the edges of the tray. I hope this helps!
ReplyDeleteThank you for your reply. I had given up as this was happening all the time but I am going to do this instead. Thank you for your help, I am glad I found your blog!
DeleteHello! Thanks so much for publishing this blog. I make glass cabochons, too. The information about the weights being applied to cabochons while they are drying and the directive about the application E6000 being very sparse and around the outer perimeter of the pendant tray and NOT the middle might just be the answers to my problems as, presently, I have about 50% failure rate with making these, and it is very disheartening as many of your readers know. I appreciate your time and energy in this posting. I will definitely be trying your techniques. Up until now, I have tried to stop bubbles and silvering with every means possible, and since much of my business relies on the cabochons I make being perfect--this has driven me crazy lately. I also live in South Texas, which is 98% humidity most days and very hot, so I am not sure if that affects my efforts either, but I suspect it does. Thanks, for posting this much needed information to the masses! :) --Tolly
ReplyDeleteVery creative crafts you have here. Good job.
ReplyDeleteThanks for the tutorial.
ReplyDeleteAbout 12 years ago I made glass pebble, photo magnets for fun - just when this craze was emerging. I used clear silicone calking/adhesive from the hardware store to glue the glass to the image (that I printed on my ink jet printer). I never had any problems. I didn't have to seal the paper with anything, never got any bubbles and it took about 5 minutes.
Now I would like to make glass photo pendants, on metal pendant trays - and all the tutorials are so time consuming and multi step.
Just wondering why you don't use silicone calking/adhesive from the Home Depot? Am I missing something? Any thoughts?
Thank you :-)
Thank you for your input - absolutely we also like silicone adhesive, but have found on the larger glass pieces it does not always dry evenly. Now I'm guessing you are across the pond from us (we're in the UK) so I don't know if our products are slightly different to what is available to you. We don't have a Home Depot, though we have many equivalent shops that offer silicone, but it tends to be available only in big tubes that need a dispenser gun - so not particularly easy to use! We do stock silicone-based adhesive in the shop, and we find it excellent on the smaller pieces of glass, but have had mixed results with the large pieces. If any of our UK readers know of a suitable brand of silicone that doesn't need a builder's gun contraption - please share it here! :)
ReplyDeleteWhat kind of mod podge should we use? Glossy or matt?:
ReplyDeleteHi K - you can use both Matte or Glossy, they will look the same under glass.
ReplyDeleteYour blog is very useful. I had a question on the weight to be placed on the glass cabochon. What amount of time is needed for the weight to remain on the glass and the image to dry? And do you have any issues with the DG completely squeezing out and causing the silvery streaks? thanks
ReplyDeletewhere do you buy your cabs and pendants? Ive ordered from multiple sites and suppliers and have had mixed results (glass too small for pendant, glass missing from order, misshapen pendants etc)
ReplyDeleteHi, we have a shop, www.jasminstudiocrafts.com, pop by! We source directly from the manufacturer and as a result our glass is top quality.
DeleteHello! We tend to leave the pieces to dry overnight with a weight on top. The silvery streaks can be caused by a stronger glue (superglue/e6000?) used behind the image to stick it into a tray. As this stronger glue dries it can pull the paper away from the glass. Try using only a tiny bit around the edge, not in the middle. Hope this helps.
ReplyDeleteWow, your instructions are SO helpful. I've been making these for awhile off and on and just had the worst time trying to get one where there weren't tiny shiny spots on the image after I put the cabochon on the picture (ink jet picture). I finally got a good one and sent it off the next day to the customer but now I need to write him to let him know that it's possible that the cabochon pendant could arrive discolored because I didn't wait long enough. Thanks again!
ReplyDelete