Friday, 24 June 2011

New in the Shop! The Jasmin Studio Crafts Grab Bag


This week we welcome the arrival of the Jasmin Studio Crafts Grab Bag.  This product has been in the pipeline for a little while now - partly because of my mission to get the whole world to give jewellery-making a go, but also because of an innate need to try to make the craft more affordable.

I am only too aware of the mounting costs of starting out in making jewellery...   there are findings, tools, pretty beads...  And if you want to sell your jewellery, there are even more costs involved in packaging, insurance, website…  The list goes on.  

And let's not forget the fact that this is one of the most addictive crafts you can devote your hard earned money to, so in all likelihood your wish list keeps growing and growing...   Experience talking here.

So hopefully this is where this little grab bag will come in useful as it offers great value for any intrepid jewellery maker who likes a surprise.  There will be findings, trays, charms, glass, necklaces and various other bits included – however this is a surprise bag so you just don’t know what you’re going to get!  The only things that won’t be included are glues, glazes and sealants, but outside of that, you will receive several fabulous things!
 

There should be enough materials in one bag to be able to make at least 10 projects, though some may need additional findings (such as jump rings or clasps) to complete them, and some will probably need a bit of lateral thinking – we will grab a handful of glass from a mixed bucket so it might or might not fit the pendant trays you will get!  Told you it was going to be a surprise!

I hope this will inspire you to try out new methods in your jewellery making.  So you have a tray but no glass?  Consider using resins, glazes, polymer clay, or glued embellishments.  Have glass but no tray?  Think about using a bail, or gluing the glass onto a ring, or a hair clip.  

 
If you’re in an adventurous mood and fancy a change from the norm that won’t break the bank? give this bag a try – its contents might just surprise you!

Tuesday, 21 June 2011

Purple Alert! Diamond Glaze Stocks Diminishing!!

**Edit:  As of July 19th, DG is back in stock!!**

A few worry-filled days since we heard from the UK distributor of Diamond Glaze that there is no Diamond Glaze to be had!  All run out!!!  And we were lucky to grab the very last box!  As we all know it's our most popular glue product so we only have a handful of 60ml bottles in stock.  We hear that the new supply of Diamond Glaze is being bottled up as I type so hopefully there won't be anything to panic about.

But what if it does run out just before your very important craft fair??  What are you supposed to do?!?

First off relax - there are options.  Consider different sized bottles, from the large 296ml one to the giant 532ml refill bottle.  That's nearly a pint of Diamond Glaze!


Another option you may not have considered, and which I personally think is brilliant, is DG3.  There will be a better introduction to DG3 in the near future, but I love love love it.  I see it as the next generation of the original Diamond Glaze and it can be used in exactly the same way but it does more in that it can also be used layered, to fill bezels, just like a resin. It seems to have less bubbles than the original DG too and it dries beautifully clear.  

DG3, ready to save the world of craft

The bottles cost more at £9.50, but you do get a bigger bottle at 120ml which is exactly twice the size of the standard Diamond Glaze, so ml for ml (or fl oz for fl oz if you're imperially inclined) it actually works out cheaper.

So if the worst comes to the worst, don't panic, there are options!


Monday, 20 June 2011

What's Your Colour?

This month we welcome this gorgeous rainbow of resin flower happiness!  It can now rain all it likes because it's all colourful over at Jasmin Studio Towers!!


Find them all in the shop!

Thursday, 16 June 2011

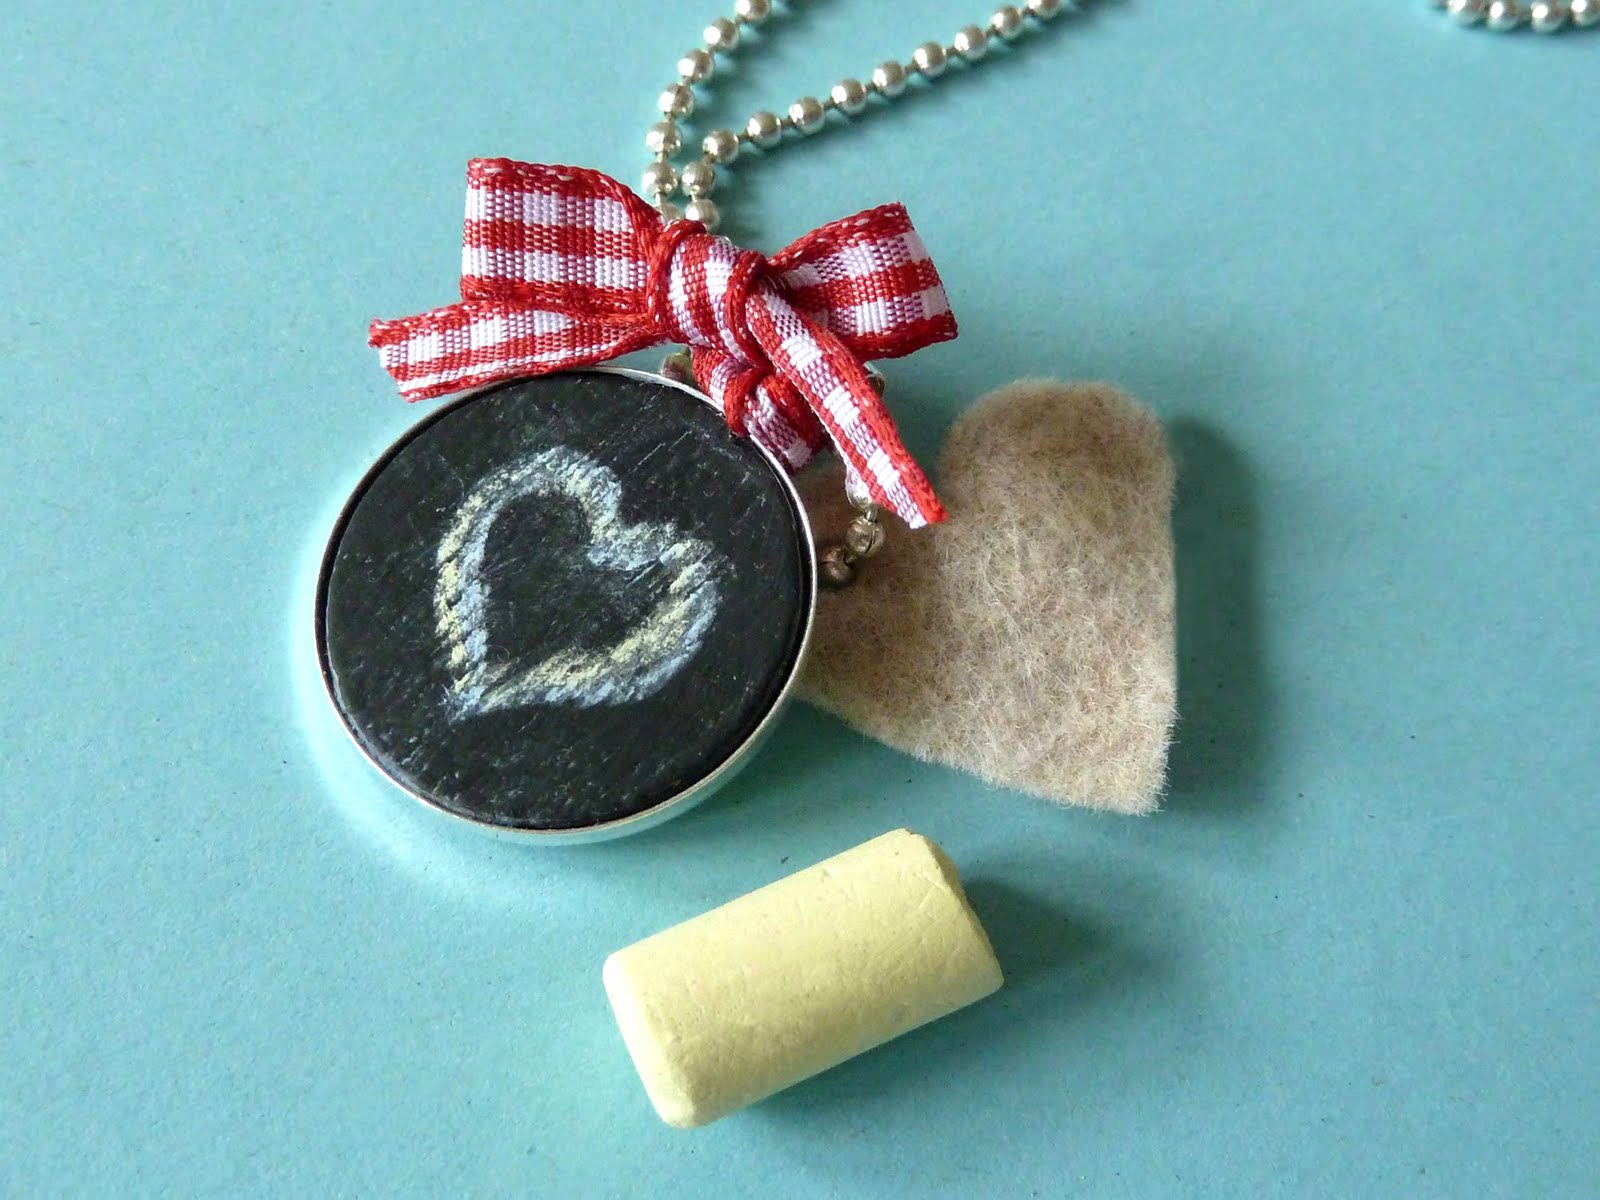
Bright Idea - A Blackboard Pendant

Super easy to make and a cute way to wear your own message.  These pendants use the new wooden tiles available in the shop, backed by a pendant tray and simply hung from a chain.


Here's how I did it.  Gather your supplies - here we have 25mm round wooden tiles, 25mm pendant trays, blackboard paint, paintbrush, E6000 glue, and of course, chalk!


This stuff is thick and gooey and quite smelly - make sure you cover all surfaces well!


Simply cover your tiles with a good few coats of the paint.  Blackboard paint generally covers well but a few coats will show less of the grain through.  Ok, I skimped and only did one!  I was in a hurry!


When it is completely dry, you can glue it to your choice of tray - here I have used a round silver plated tray.  I find E6000 glue is ideal for this as it will hold fast, or you can use any superglue type of adhesive that you may have at home.

When that is dry, you can hang it from your favourite chain.  I have added a little ribbon and a little felt heart rubber to this one.  Finally, use a sharpened chalk (use sandpaper to get a fine point on your chalk) to draw your message, package simply in a cellophane bag with a teeny bit of chalk and give freely!  

With a tiny bit of supervision (especially around the paint and the glue) you can easily let your kids make them as original gifts for their teachers now that the end of year is almost here.  Let them state proudly "here you go Miss, I made this one for you!"


Friends' Makes - Tynemouth Collectables

When I set off on this little adventure at the start of the year, I was excited to find out that there were people out there who agreed with me that glass tile jewellery is a really satisfying way to present your favourite art.  And soon I was talking to all sorts of wonderful crafters and jewellery makers - every one of them an artist in a different way.  There has been one person whom I have been talking to since the very beginning and who is quickly becoming a good friend - although we have never met in person!  Her name is Vicky, she runs Tynemouth Collectables, a jewellery business, and makes beautiful pieces using some of the items from my shop, as well as some carefully sourced papers and images.  Look at this beauty:


And this striking image on the bag hanger:


Vicky was also the person who sent me that stunning pendant she had made earlier in the year, which I'm still wearing!

She is a devoted crafter and a talented artist - and now I have discovered that she has the patience to put up with my ranting when my life gets hairy! 
Vicky has big plans for her business and I am in no doubt that her own adventure into jewellery making will be a successful one.  I know she is now diversifying into steampunkery, so keep an eye on her website

Mirror Mirror...

Very excited about the arrival of these mirrors - will you just look at them!


Isn't that beautiful?  The paper is one of my Chiyogamis, and we are going to be selling these mirrors together with the gorgeous epoxy sticker that allows you to achieve a professional finish very easily.  I can see myself making these with photos for Christmas (I'm becoming obsessed with Christmas planning, I know).

And look, you get not one but two mirrors inside:


And isn't this a lovely, unexpected bonus - a beautifully engraved underside.  


They are available in the shop for only £3 individually or buy more and get them for less.  Bargain!

Monday, 30 May 2011

Tieta Loves Cheese - A Tutorial on Magnets

My Tieta Carme loves her cheese.  Tieta, is Catalan for an auntie, a familiar form derived from the word 'tia' (aunt), connoting that she is someone that you are quite close to.   I am.

It was always a family ritual that when any one of us went away somewhere far from home we would bring back a souvenir for everyone, and she got either cheese or make up, but usually cheese.  Even when I was quite small and used to come to London as an unaccompanied minor with my red Iberia bib bag with all my worldly paperwork stuffed into it, I remember going back with a selection of British cheeses for her...   In those days when I was the souvenir recipient I was much keener to get the odd airport toy or sheet of stickers myself, but now I have moved to the cheese side, and I totally get her.  

I recently discovered that there's a universe full of people out there who collect vintage French or Swiss cheese labels for fun.  Well I jumped onto that bandwagon sooner than you can say reblochon, and found a wonderful seller of quirky graphics, Harmonica Godlfish who had just the images I had in mind. Do check out the shop - it is pretty magical. 

So in honour of my favourite tieta, I made some cheese label magnets to adorn her fridge.


Resizing the images to fit the 25mm trays was a bit of a technical pain in the proverbial, but we got there.  I printed out a sheet full, and cut them to size using a craft punch.  Then I coated the images with a bit of hairspray (here Sainsbury's value range, cheap as chips).  They were laser prints on good thick paper and I was going to be using epoxy resin stickers, so not crazily worried about the inks running here, but still.  One precaution won't hurt.


When dry, I glued the self adhesive epoxy stickers over the top of the images.


I had already cut the images and centering the sticker correctly was nowhere as difficult as I'd envisaged (normally I stick first and then cut the image around the sticker).

Then I ModPodged some blank cabochon settings, and popped the domed images into those, wiping away any excess out of the sides.


Inspect your work.  Be pleased at how pretty it turns out.  My fingers were stained from a previous project, I do normally wash my hands but that black paint proved a nightmare to clean.  Thank the world of science for surgical spirit which removed most of the mess!

I have recently come across some fantastic self-adhesive neodymium magnets, which means they are very strong, but they come with an equally strong sticker that you just peel off and attach to wherever you need.  They will be in the shop shortly. 


And they went onto the backs with a pretty neat finish (unlike every other time I have used glue and made a humongous mess of the backs)


I like the way they click together...


Hey, I'm easily amused.  Even now I can still have great fun with a magnet, much like my five year old does.

Magnets are finished.  I love these so much, I'm going to make a set for myself.  And maybe for all my cheese loving friends, and perhaps for an ex-boss I am still in touch with, whom we used to call 'le grand fromage'.  Apt, methinks. 

But these, these are for tieta.  x


Sunday, 29 May 2011

How NOT to Make a Glass Tile Pendant Part 4 - Sizing

So I made a rather beautiful pendant (image inside pendant credit to Digitalya).


I struggled a little bit with the US-letter-sized digital collage sheets as when printed on A4 paper the images come out bigger than they were intended to be.  Of course, you can avoid this by choosing not to fit-to-page on your printer settings, but this was a rather big professional laser printer and the shop assistant at the printing shop I went to for these had only just started working there and seemed not to know the printer too well, and neither did I, so I didn't want to push it.

And there is another little issue, that a lot of these gorgeous images are sold as 1x2 inches, and my trays and glass are 24x48mm - a fraction smaller.  So not only are the images slightly big for my purposes anyway, but I also had the printer issue which meant that in the end my images were a couple of mm bigger per side.  This slightly larger size would be fine under normal circumstances but these beautiful images have a deep shading around them that frames the image and gives them a feeling of depth that I like a lot.  So because I had to end up cutting the images to the smaller size I needed, I had to cut pretty much all of the shading out, which made me get annoyed at myself for not pushing the printer guy to get it done properly!

Anyway, problem number two, as a result of the image being bigger than I needed, I had no natural outline to cut around, and no craft punch to use (like I do with my circle images) - so I cut it by hand.  But I got cocky and decided not to use a template.  Freehand cutting!  Now that is a recipe for disaster in my hands!!  And so it was.  It looked nice at first, huh?  And then you saw the other side:


 See anything yet?  No?  Try this:


See it now??  Yep, I cut away too much, ruined a perfectly good image and a good bit of effort.  I did realise it was cut slightly too narrow when I placed it onto the glass, but I thought I had centered it nicely only to find out that actually, it couldn't be more askew if it tried. Also for those of us who use glass, it's worth remembering that the glass will magnify all your mistakes...

So another one resigned to the soaking bin.  Moral of the story, if you can't use a paper punch to get accurate images, make yourself a template - this is very easy, just grab a piece of card and cut out your shape from it, then use it as a viewer to center your image so that you know where to cut, and draw around the shape on pencil onto your image and cut around that line.  This drawn line will sit at the edge of the image so won't show behind the glass or under the glaze or resin.  Of course if you're using glass you can just use the glass shape as a template, but the card version is useful if you use your images over wooden blanks or scrabble tiles for example.

Friends' Makes - Dawn's Fairy Lovely Clips

Today, I present to you the work of the Dawn of Polly Red Crafts who makes very cute jewellery for girls of all ages as well as some very beautiful and very grown up pieces from woven wire.  See below the gorgeous hair clips she made using the clips and resin stickers available in my shop with images from Cicely Mary Barker's Flower Fairies - a favourite collection of books in our house too!  


Whilst Dawn is busy uploading lots of new things to her Folksy and Wowthankyou shops, you can follow her through the Polly Red Facebook page.  Be sure to visit and say hi!

Wednesday, 11 May 2011

Meet the Family

Here we have the Glass family - they're all very smart, an accomplished lot.


Here they are, all posing together for the first ever Glass family photo.

They are:
Rectangles (flat): 24x48mm,
Squares (flat):  25mm, 20mm
Squares (domed): 12mm, 15mm, 20mm, 25mm
Circles (flat):  25mm
Circles (domed):  8mm, 10mm, 12mm, 14mm, 15mm, 16mm, 18mm, 25mm
Ovals (domed): 13x18mm, 18x25mm
Hearts (domed):  16mm, 23.5mm

My how the family has grown from just two eager tiles back at the start of the year!  Rabbits!