Judikins Fluxe vs Amazing Glaze – Get Set to be A-Glazed!
When asked if I would be guest blogger for Jasmin I was quite flattered and more than keen to help her work out the difference between Judikins Fluxe Enamelling Resin and their Amazing Glaze Embossing Glaze. By all intents and purposes, when researching the two on the good ole internet it is very hard to differentiate between them.
OK, Amazing Glaze is designed to be used with embossing powders and the likes for making a glaze on all sorts of paper and card surfaces – ideal for cardmakers and scrapbookers alike.
Fluxe is described as an “enamelling” resin and can be used on a wide variety of surfaces including metal and glass. I therefore would have expected Fluxe to appeal more to my uses in making jewellery and filling small metal trays or pateras. So I was surprised to find in one of the “projects” featured on Judikins website, they were filling their trays with Amazing Glaze? Hmm…the confusion abounds!! I had no choice but to do a test and compare results!!
Firstly I drew a 1” circle around two images that I was going to use and cut them out, making sure I removed the part with the pen line. I then lined the inside of the tray with Mod Podge, placed each disc of paper on top, gently pressed it down to remove any bubbles and smooth the paper.
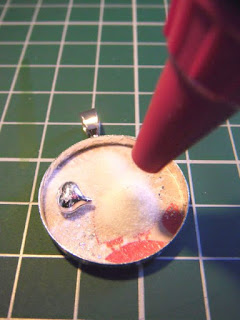
I then gave it a second coating of Mod Podge. This both glues the paper in place and seals the paper to prevent any of the inks from running. After leaving the trays to dry, I lined them up and put a small amount of an old embossing powder I had, to add some sparkle and put along side it a small heart shaped charm so that I could play with how easy it is to move items around and to add an extra dimension to the pendants. I dipped the tray in to the pot of Amazing Glaze, levelled it flat and then filled the second tray with the Fluxe.
Having two small dogs and a flight of stairs to contend with when carrying these trays from my crafting area to our grill/oven, I decided health and safety was more important and set to work with my heat gun. (Please be aware, if you pile the powder high, a heat gun will blow the top layer of glaze across your table!)
Both powders melt in the same way and have the appearance of melting sugar. As the top layer melts, it rolls away to the sides, exposing the powder underneath until all has been melted. When the glaze is still soft, you can move around any little charms or embellishments you used until you are happy.
I used a pair of bent nose pliers, but a pair of tweezers would do the same job. Be Careful not to touch the pendant with your fingers as it will still be very hot. I had to refill the trays an extra three times to fill the tray to the top, so this is brilliant to give you the opportunity to add different embellishments in different layers. Should your tweezers get stuck in the resin, or if your charm or embellishment gets stuck in the wrong position, you can reheat the resin until soft and move the item accordingly.
Leave your pendant to cool for a few minutes and Hey Presto! You have your perfectly set, hardened, ready to wear pendant! Attach a necklace and away you go!
But that still hasn’t answered my question about the main difference between the two? It’s tough. They have the same consistency, they melt the same and they set the same. Initially they look the same so in all honesty, I don’t see a whole lot of difference. The picture below shows the two trays side by side. The one on the right is made using Amazing Glaze, the one on the left with Fluxe. I find that the Amazing Glaze has perhaps a slightly clearer appearance to the Fluxe.
Amazing Glaze is a bit more forgiving when wiping off any melted glaze from the tray, whereas the Fluxe was a lot more stubborn. I left both trays overnight before writing this post and have discovered that the Amazing Glaze seems to have turned slightly darker.
Compare the two again below, sitting atop the original paper. The Amazing Glaze is somewhat darker than the Fluxe.
All in all, both glazes are easy to use, non-toxic and suitable for anyone able to use a heat gun. They can both be melted at 130oC in a toaster oven – though I have not tried this so cannot advise, but I hear that you don’t get the problem of the powder blowing away then.
The glazes will be perfect for those projects that I want to look a bit more weathered, maybe using an antiqued vintage setting, so I think I will definitely be playing some more with the glazes. Which is better? It all depends on your needs and what effect you wish to gain.
Happy experimenting!


No comments:
Post a Comment
Comments are moderated and may or may not get published. Please view our blog policy on www.jasminstudiocrafts.com/policies
If you have a specific issue you would like to discuss with us, please contact us at mail@jasminstudio.com and we will try our best to help.